Hey all! Here's my first instructional video: filmed and produced by the great folks at How 2 Heroes, it's my first foray into film. Agua frescas are really easy to make and are super for summer. Cheers!
Saturday, May 9, 2009
Friday, May 8, 2009
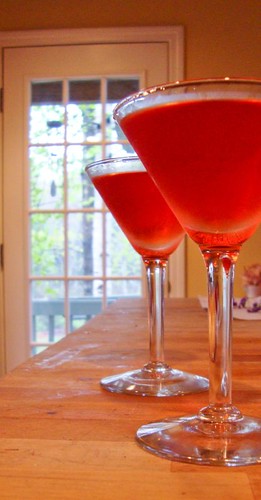
Drink of the Week: The Rosita
 I was looking for a tequila drink to celebrate Cinco de Mayo with, but the 5th was rainy and cold and very un-Margarita-like. Adam @ the Boston Shaker (Your Friendly Neighborhood Cocktail Supply Shop) to the rescue! He twittered (tweeted? still working on my Twittercabulary) about a drink called the Rosita and after reading the recipe at DrinkBoy, I headed straight to the liquor cabinet to mix one up.
The unusual pairing of Campari with tequila may stop some of you in your tracks, but the combination works really well. The other ingredients mellow the Camapri's bitterness: it's still there, but it plays more of a backing role instead of muscling through all the other flavors (as it sometimes does in a Negroni).
The Rosita
In an iced mixing glass, combine:
- 1 1/2 ounces tequila
- 1/2 ounce Campari
- 1/2 ounce sweet vermouth
- 1/2 ounce dry vermouth
- dash of Angostura bitters
If this is still too Campari-heavy for you, reduce the amount to 1/4 ounce and work your way up to a level of bitterness that works for you.
Thursday, May 7, 2009
Review: Oceanos Oyster Bar & Sea Grill
 Oceanos Oyster Bar & Sea Grill
2-27 Saddle River Road, Fair Lawn, NJ 07410
201-796-0546
Accepts all credit cards.
This past weekend, Beppo and I headed down to New Jersey for my niece's baptism. The reception was held at Oceanos. I have been to this restaurant a few times and have always been pleased.
The executive chef and owner Peter Panteleakis takes a lot of care with the quality of his food, especially the seafood. His level of involvement extends to his daily baking of the day's bread (from his own starter, no less) after he has gotten back from his trip to the Fulton Fish Market.
By way of full disclosure, my father and his wife are friends of the owners so we always get a great greeting and very personalized service. That said, I was extremely impressed by the exceptional service our party of 30+ got at the reception. It's not easy to take care of a large group and they did a great job. I also watched the servers taking care of other tables and the diners seems happy and cared for.
On Sunday, I met my dad and wife for lunch and we ended up back at Oceanos. We frequently have the same type of meal: salad, fish and dessert, so I can't really describe much else from the menu.
At the reception, we did have the collection of Greek spreads (taramasalata, ktipiti: a feta spread, hummus and melanzanasalata: an eggplant salad) served with grilled pita and they were fantastic. Highly recommended.
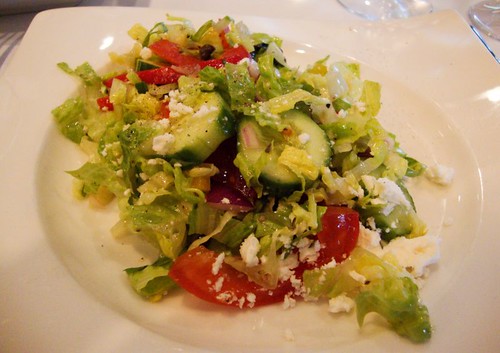
The Greek salad is great. Shredded romaine, tomatoes, red peppers, olives and feta are dressed with a nice lemony salad dressing. With the fresh house-made bread, it makes a great starter.
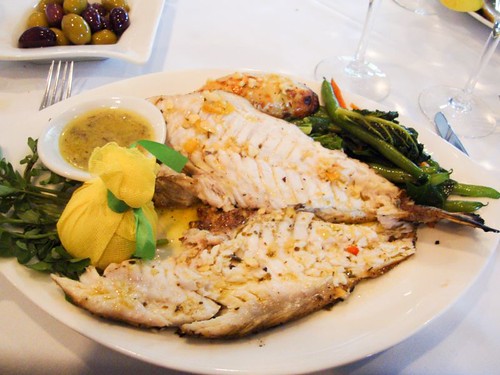 Oceanos prides itself on the the food it serves, especially the seafood. When we arrive, my father always consults with Peter as to what's best (or most interesting or unique) on the menu that day. You can do that too and I recommend you do so. Your fish (depending on what's available, you can get one for the table or your own fish if not everyone wants the same thing) will be grilled in the kitchen and brought to the table butterflied, deboned and sans head (no worries about your dinner looking at you). The sides are pretty standard: vegetables, potato and an oregano and lemon sauce. Fresh fish cooked this way is great: the flesh is sweet, with just a hint of smokiness. The lemon sauce provides a great contrast but isn't actually needed. We had white snapper which was a new fish for me. (By the way, check out those gorgeous olives - that's what olives should look like: plump, glossy and firm.)
We drank a Lazaridis Amethystos Drama 2007 with the meal. A lovely wine from the North of Greece, it's a sauvignon blanc/semillon blend. It was served at the perfect 50 degrees and was a great pairing for the salad and the fish. The Oceanos wine list is reasonably long (very heavy on California wines and with an extensive selection of Greek bottles) and very reasonably priced, with a good number of wines in the $25-40 price range.
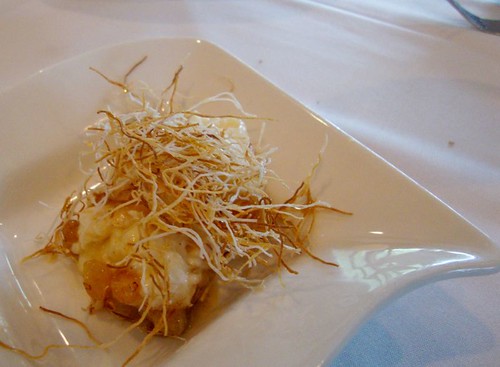 Finally, dessert. Oh my lordy. I'm not really a dessert person so I usually take a few bites to be polite. Peter suggested that we finish our meal with rice pudding (risogalo). Rice pudding is not something I normally get excited about it, but I am still thinking about this one. This picture is my little dish of rice pudding; we had been served family-style so we each could take as much as we wanted.
First the rice pudding itself was creamy and sweet, but not overly so. It was topped with toasted kataifi (similar to shredded phyllo) and golden raisins that had been plumped up with a caramel syrup. I made sure each bite contained the contrasting textures of the creamy rice pudding and the crunchy kataifi and the slightly tart punch of the raisins. This dish is what rice pudding should be.
I was already impressed with what a great place Oceanos is (if we lived four hours closer, I think we'd be regulars), but when we complimented the coffee, Peter completely blew my mind (in the best possible way). Restaurant coffee is frequently an afterthought: it's the cup that wakes you up enough to get you home after dinner, but I seldom think "wow, that's good coffee". This coffee was remarkably good and didn't need the cream and sugar I normally have to add to restaurant coffee to make it drinkable. Peter told us that his coffee is a custom-roasted brew from Allann Brothers. He buys whole beans, grinds them as needed and then (this is where he won my heart) he brews into thermal carafes. And then, if it's not all served, the coffee is discarded after 20 minutes of sitting around. This results in a brew with very little bitterness or oxidation. It can't be cheap for him, but it's fabulous for the customers.
This is a guy who cares about quality. A lot. Please give this restaurant a try if you're nearby I know you'll enjoy. His menu of regular dishes (but not specials) is online - take a look, there's something for everyone. I didn't see the check, so I don't know what the total was but the online menus have actual pricing, so you can estimate costs for yourself.
Monday, May 4, 2009
Easy Eating: White Bean Salad
 I put this salad together for the Encased Meats Festival that Linsey over at Cake and Commerce hosted a few weeks ago. I wanted something to provide a contrast to a gyro-style sausage that I'd made. The creaminess of the white beans is set off really nicely by chunks of cherry tomatoes, Kalamata olives and dill. I used a simple red wine vinaigrette as a dressing but a lemon-based dressing would be great too.
 I recommend that you cook your own beans for the salad if you can: they'll be a little creamier than canned and you'll be able to control the saltiness a little better. That said, if you want to use canned beans, go right ahead and feel no guilt about it. Of course, feel free to vary the ingredients based on what you have on hand.
This salad is best if you make it a few hours ahead. It makes a great side with grilled meat or vegetables. For an easy vegan dinner pair it with a green salad and a grilled portobello mushroom.
White Bean Salad
Serves 4-6
- 4 cups cooked white beans (about 1 1/2 cups dry beans cooked or 2 large cans of beans, rinsed and drained)
- 1 pint cherry tomatoes, sliced in quarters
- 3/4 cup Kalamata olives, pitted and torn in halves
- 1 bunch of scallions, sliced
- handful of dill, chopped
- red wine or sherry vinegar
- olive oil
- salt and pepper
Friday, May 1, 2009
Two Quick Sauces for Summer
 The summer grilling season approacheth. It's a good time to (re)introduce chimichurri to everyone. Traditionally, chimichurri from Argentina and Uruguay and is a sauce for grilled meats. What I love about chimchurri sauces is that they can be made ahead and kept as an insurance policy against boring food. You can also stir the sauces into a pasta salad or cole slaw or bean salad to jazz them up.
A parsley-based chimichurri is the version most people are familiar with. I just found a recipe for the red version of chimichurri. I can tell it's going to become a go-to condiment for me this summer: it's super easy to make and will keep in the fridge for a while.
Chimichurri (Green)
Yields about 2 cups
This is the version you're most likely be served. My version results in pesto-like version. If you prefer a looser consistency, adjust the sauce with more vinegar and oil.
- 4 cloves garlic, minced or pressed
- 1 bunch of parsley, leaves only
- 1/4 cup red wine vinegar
- 1/4 cup fresh oregano leaves(substitute 2 teaspoons dried oregano, or omit oregano entirely)
- 2 teaspoons crushed red pepper
- Kosher salt and freshly ground pepper to taste
- 1/2-3/4 cup extra-virgin olive oil
 Red Chimichurri (Chimichurri Rojo)
Yields about 1 cup
This yield a very liquid sauce, more like a salad dressing. I keep it in a squeeze bottle and give a squirt to dishes that need jazzing up.
Adapted from Norman van Aken.
- 1/2 cup sherry vinegar or red wine vinegar (the sherry vinegar results in a much more interesting sauce, but use a good red wine vinegar if that's what you have on hand)
- 1/4 cup virgin olive oil
- 1 1/2 tablespoons hot paprika (use half hot paprika and half smoked paprika for an interesting version)
- 2 teaspoons cayenne pepper (leave out if you don't want it to be too spicy)
- 4 cloves garlic, minced
- 1 teaspoon freshly ground black pepper
- 1/2 teaspoon kosher salt, or to taste
Monday, April 27, 2009
Daring Bakers April: Cheesecake Centerpiece
 The April 2009 challenge is hosted by Jenny from Jenny Bakes. She has chosen Abbey's Infamous Cheesecake as the challenge.
This month's Daring Bakers post was centered on cheesecake. We were given a free hand to flavor and decorate the cheesecake as we desired. I have to confess to not being a huge cheesecake fan, so I decided to highlight what I really enjoy about cheesecake: its tanginess and the contrast of the crust against the creamy cheese cake.
I've posted the recipe below for those who want to try it at home. I wasn't 100% happy with the recipe; I thought the result was too sticky and didn't cut cleanly, but based on the other cheesecakes I've seen posted others didn't have the problems I did (I'm still adjusting to my new oven and that may have been a factor.). My taste testers were extremely happy with the results however, so I consider the whole operation to be a success.
I did not make many changes to the recipe other than adding 3 lemons' worth of zest to the cheesecake batter.
 I topped the cheesecake with a thick layer of lemon curd and then piped meringue over the top. I pulled out my handy-dandy bruleeing torch and toasted the top for a lemon meringue pie look.
Here are all recipes I used:
Abbey's Infamous Cheesecake
crust:
- 2 cups / 180 g graham cracker crumbs
- 1 stick / 4 oz butter, melted
- 2 tbsp. / 24 g sugar
- 1 tsp. vanilla extract
cheesecake:
- 3 sticks of cream cheese, 8 oz each (total of 24 oz) room temperature
- 1 cup / 210 g sugar
- 3 large eggs
- 1 cup / 8 oz heavy cream
- 1 tbsp. lemon juice
- 1 tbsp. vanilla extract (or the innards of a vanilla bean)
- 1 tbsp liqueur, optional, but choose what will work well with your cheesecake
1. Preheat oven to 350 degrees F (Gas Mark 4 = 180C = Moderate heat). Begin to boil a large pot of water for the water bath.
2. Mix together the crust ingredients and press into your preferred pan. You can press the crust just into the bottom, or up the sides of the pan too - baker's choice. Set crust aside. (My note: TRIPLE wrap the pan with foil with save it from encroachment by the water bath.)
3. Combine cream cheese and sugar in the bowl of a stand-mixer (or in a large bowl if using a hand-mixer) and cream together until smooth. Add eggs, one at a time, fully incorporating each before adding the next. Make sure to scrape down the bowl in between each egg. Add heavy cream, vanilla, lemon juice, and alcohol and blend until smooth and creamy.
4. Pour batter into prepared crust and tap the pan on the counter a few times to bring all air bubbles to the surface. Place pan into a larger pan and pour boiling water into the larger pan until halfway up the side of the cheesecake pan. If cheesecake pan is not airtight, cover bottom securely with foil before adding water.
5. Bake 45 to 55 minutes, until it is almost done - this can be hard to judge, but you're looking for the cake to hold together, but still have a lot of jiggle to it in the center. You don't want it to be completely firm at this stage. Close the oven door, turn the heat off, and let rest in the cooling oven for one hour. This lets the cake finish cooking and cool down gently enough so that it won't crack on the top. After one hour, remove cheesecake from oven and lift carefully out of water bath. Let it finish cooling on the counter, and then cover and put in the fridge to chill. Once fully chilled, it is ready to serve.
Prep notes: While the actual making of this cheesecake is a minimal time commitment, it does need to bake for almost an hour, cool in the oven for an hour, and chill overnight before it is served. Please plan accordingly!
Lemon CurdThis recipe is taken from Elinor Klivans and I love it, check out the Fine Cooking post for helpful photos. The technique of whipping everything together and then heating it save you from whipping up a batch of lemon-scented scrambled eggs.
You'll end up with about two cups, which will be a little too much for the cheesecake, but leftovers are great on toast or scones or ice cream.
- 6 tablespoons unsalted butter, at room temperature
- 1 cup sugar
- 2 large eggs
- 2 large egg yolks (save the whites to use in the meringue)
- 2/3 cup fresh lemon juice
- 1 tsp. grated lemon zest
In a large bowl, beat the butter and sugar with an electric mixer, about 2 min. Slowly add the eggs and yolks. Beat for 1 min. Mix in the lemon juice. The mixture will look curdled, but it will smooth out as it cooks.
In a medium, heavy-based saucepan, cook the mixture over low heat until it looks smooth. (The curdled appearance disappears as the butter in the mixture melts.) Increase the heat to medium and cook, stirring constantly, until the mixture thickens, about 15 min. It should leave a path on the back of a spoon and will read 170°F on a thermometer. Don't let the mixture boil.
Assembling the cheesecake
Spread a layer of lemon curd over the top of the cheesecake. Pipe the egg white meringue over the top the cheesecake. Using a bruleeing torch toast the meringue until golden. If you don't have a torch, you can run the cheesecake under the broiler to brown the top.
Store in the refrigerator until ready to serve.
Remove the curd from the heat; stir in the lemon zest. Transfer the curd to a bowl. Press plastic wrap on the surface of the lemon curd to keep a skin from forming and chill the curd in the refrigerator. The curd will thicken further as it cools. Covered tightly, it will keep in the refrigerator for a week and in the freezer for 2 months.
Meringue topping
- 4 egg whites
- pinch salt
- pinch of cream of tartar
- 2 tablespoons sugar
Assembling the cheesecake
Spread a layer of lemon curd over the top of the cheesecake. Pipe the egg white meringue over the top the cheesecake. Using a bruleeing torch toast the meringue until golden. If you don't have a torch, you can run the cheesecake under the broiler to brown the top.
Store in the refrigerator until ready to serve.
Friday, April 24, 2009
Drink of the Week: Blueberry-Ginger Cooler
 I am sending thanks to the great folks at Domaine de Canton, who sent me a bottle of this delicious liqueur. I am having a lot of fun experimenting with it! This is the second drink I feel is ready for public viewing and consumption. The current working name is the Blueberry-Ginger Cooler, but I am open to suggestions for a better name.
This drink uses blueberry puree. I had a small amount of puree left over from a video shoot (eek!) I just finished with How 2 Heroes (videos coming soon). To make your own, puree 1/2 cup of blueberries (frozen are perfect for this) with 1/2 cup of water. Alternatively, for a more rustic approach, just muddle some berries (a small handful) right in your mixing glass.
I used tequila in this version, but I think a light rum might be nice too. Also, I tried a small variation and added a wee bit of red wine vinegar (1/4 ounce) to the drink in a small play on a shrub (a fruit, sugar and vinegar cooler - don't knock 'em till you try 'em).
Blueberry-Ginger Cooler
In an iced mixing glass, stir together until well-chilled:
- 2 ounces Domaine de Canton liqueur
- 1 ounce tequila
- 2 ounces blueberry puree
Subscribe to:
Posts (Atom)