Hey all! Here's my first instructional video: filmed and produced by the great folks at How 2 Heroes, it's my first foray into film. Agua frescas are really easy to make and are super for summer. Cheers!
Showing posts with label fast. Show all posts
Showing posts with label fast. Show all posts
Saturday, May 9, 2009

Monday, May 4, 2009
Easy Eating: White Bean Salad
 I put this salad together for the Encased Meats Festival that Linsey over at Cake and Commerce hosted a few weeks ago. I wanted something to provide a contrast to a gyro-style sausage that I'd made. The creaminess of the white beans is set off really nicely by chunks of cherry tomatoes, Kalamata olives and dill. I used a simple red wine vinaigrette as a dressing but a lemon-based dressing would be great too.
 I recommend that you cook your own beans for the salad if you can: they'll be a little creamier than canned and you'll be able to control the saltiness a little better. That said, if you want to use canned beans, go right ahead and feel no guilt about it. Of course, feel free to vary the ingredients based on what you have on hand.
This salad is best if you make it a few hours ahead. It makes a great side with grilled meat or vegetables. For an easy vegan dinner pair it with a green salad and a grilled portobello mushroom.
White Bean Salad
Serves 4-6
- 4 cups cooked white beans (about 1 1/2 cups dry beans cooked or 2 large cans of beans, rinsed and drained)
- 1 pint cherry tomatoes, sliced in quarters
- 3/4 cup Kalamata olives, pitted and torn in halves
- 1 bunch of scallions, sliced
- handful of dill, chopped
- red wine or sherry vinegar
- olive oil
- salt and pepper
Friday, May 1, 2009
Two Quick Sauces for Summer
 The summer grilling season approacheth. It's a good time to (re)introduce chimichurri to everyone. Traditionally, chimichurri from Argentina and Uruguay and is a sauce for grilled meats. What I love about chimchurri sauces is that they can be made ahead and kept as an insurance policy against boring food. You can also stir the sauces into a pasta salad or cole slaw or bean salad to jazz them up.
A parsley-based chimichurri is the version most people are familiar with. I just found a recipe for the red version of chimichurri. I can tell it's going to become a go-to condiment for me this summer: it's super easy to make and will keep in the fridge for a while.
Chimichurri (Green)
Yields about 2 cups
This is the version you're most likely be served. My version results in pesto-like version. If you prefer a looser consistency, adjust the sauce with more vinegar and oil.
- 4 cloves garlic, minced or pressed
- 1 bunch of parsley, leaves only
- 1/4 cup red wine vinegar
- 1/4 cup fresh oregano leaves(substitute 2 teaspoons dried oregano, or omit oregano entirely)
- 2 teaspoons crushed red pepper
- Kosher salt and freshly ground pepper to taste
- 1/2-3/4 cup extra-virgin olive oil
 Red Chimichurri (Chimichurri Rojo)
Yields about 1 cup
This yield a very liquid sauce, more like a salad dressing. I keep it in a squeeze bottle and give a squirt to dishes that need jazzing up.
Adapted from Norman van Aken.
- 1/2 cup sherry vinegar or red wine vinegar (the sherry vinegar results in a much more interesting sauce, but use a good red wine vinegar if that's what you have on hand)
- 1/4 cup virgin olive oil
- 1 1/2 tablespoons hot paprika (use half hot paprika and half smoked paprika for an interesting version)
- 2 teaspoons cayenne pepper (leave out if you don't want it to be too spicy)
- 4 cloves garlic, minced
- 1 teaspoon freshly ground black pepper
- 1/2 teaspoon kosher salt, or to taste
Tuesday, April 21, 2009
Turkey Tacos
 This is a multi-stage recipe (for which I only have one picture, unfortunately), but I thought it was worth sharing with you.
 Way back when in November, I bought a locally-raised turkey. Since we didn't need a whole bird just for our little Thanksgiving, I carved off the leg pieces and wings and put them in the freezer until later ...
... many months later ... I found my bag of turkey bits in the deep freeze. I had read about confiting turkey legs and was hoping to save up enough chicken fat to try that technique with these. Despairing of that ever happening I decided to jump start the process by using olive oil and some pork fatback.
I seasoned the pieces with salt and pepper and let them rest in the fridge overnight. The next day, I put the turkey pieces, peppercorns, a head of garlic, and several bay leaves into my crockpot and covered them with oil. After eight hours of slow cooking, the pieces were cooked through and silky. The result was as unctuous as a duck confit and the legs were way too big to fry up in a pan. I pulled the meat off the bones and covered it in the oil.
Now, how to use up this bounty (about three pounds of meat) ? A few pieces got sauteed and served over a salad with a poached egg. A few more went into an omelet. A few more onto a sandwich. Oy, that's a lot of turkey meat I still have in the fridge. So, tonight the rest went into tacos.
Finally, a recipe. Here you go:
Turkey Tacos
serves 4
- 1 onion, chopped
- 3 tablespoons chili powder
- 1/4 cup tomato sauce (or not, I had it in the fridge)
- 3 cups cooked turkey meat
- Juice of 1 lime
- For serving: tortillas, sour cream, shredded cheese, shredded cabbage, sliced chilies, etc.
Serve with accompaniments of your choice.
Impromptu Carrot Soup
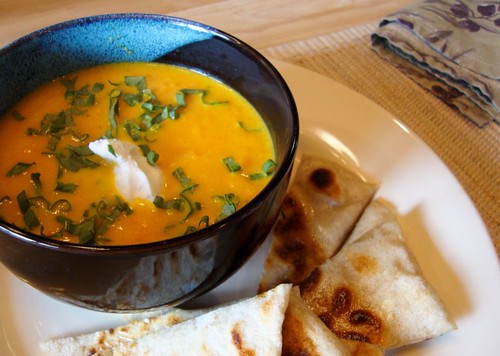 As I mentioned previously, Saturday was a pretty busy day what with making our bees at home. I did a fair amount of work outside as well and when it was time for lunch I was sorta stumped. A quick glance in the refrigerator inspired a speedy soup.
I had a monster bag of baby carrots on hand (leftovers from a large party). I hate baby carrots and knew we'd never get through that bag if we ate them raw. A soup seemed like the best option. I also had some left over orange juice from earlier in the week. Finally, the herb garden is supplying me with chives and sorrel.
I do love orange food, don't I?
Quick Carrot Soup
Serves 2-4
- 1 medium onion, chopped
- 3 pounds carrots, chopped
- 2 cups orange juice
- water
- Minced herbs for garnish
- Yogurt or sour cream for garnish
Bring to a boil and simmer until carrots are soft (about 10-15 minutes; the smaller your carrot pieces, the faster they'll cook). Use an immersion blender or regular blender to puree the soup, adding more water or juice if it's too thick.
Taste and adjust seasoning as necessary. Garnish with a dollop of yogurt and some fresh herbs.
Thursday, April 16, 2009
Ouzo-Spiked Shrimp
 This is a great "what the heck's the dinner tonight?" dish. Everything you need to make it comes from the freezer or kitchen cabinet, if you've got a little fresh greenery for garnish, all the better!
 Ouzo-Spiked Shrimp
Serves 4
Recipe notes: I used ouzo to deglaze the pan and add a fennel flavor to the dish, but you can use white wine, rum, tequila or dry vermouth instead.
If you prefer, you can leave out the chickpeas and double the amount of shrimp.
- 1 onion, chopped
- 3 cloves of garlic, minced
- 1/4 cup ouzo
- 1 28 oz. can of plum tomatoes, tomatoes chopped or torn into pieces
- 1 15 oz. can chickpeas, drained
- 2 tablespoons capers
- 1/2 pound of shrimp
- minced herb for garnish, optional
Add the tomatoes to the pan. Bring to a simmer and let simmer until a little thickened. Taste for seasoning and add salt or pepper as needed.
Stir the chickpeas, capers and shrimp into the pan. Simmer until the beans are warmed and the shrimp are cooked through.
Serve with rice, pasta or a big hunk of fresh bread.
Wednesday, February 4, 2009
Eatchergreensnbeans!
 I love greens and beans. When I do know what to make for dinner a "greens 'n' beans pile" usually fits the bill. Ideally, I have fresh greens on hand (1 big bunch per person being served), but if I don't I have no compunction about pulling a big bag of chopped spinach or collards out of the freezer.
I serve "the pile" over rice, quinoa or millet and sprinkle it with grated cheese (if I'm really under the gun, I serve over toasted bread: it's becomes a big, sloppy bruschetta). Depending on the night, I might top the dish with a fried or poached egg. It's a satisfying dinner that is quite good for you too.
This version was made with a bunch of dandelion greens, a bunch of beet greens and chickpeas and topped with some grated aged goat cheese. I served it over quinoa.
Beans 'n' Greens
Serves 2-3
- Quinoa, rice, millet or any other grain of choice or several slices of hearty bread, toasted
- 1 onion, peeled, cut in half and sliced into half circles
- 2 bunches of greens (chard, beet greens, kale, collards, spinach), stemmed and chopped or 1 bag (16 oz.) of chopped spinach or collards
- 1 can of beans (your choice), drained
- cheese for sprinkling
Saute the onion over medium-high heat in a little oil in a large skillet. When it is golden brown (about 10 minutes), add the chopped greens to the skillet. Using tongs or two spoons, turn the greens over and over as they wilt down (this can take about 10 minutes). If the pan gets too dry, add a little water to keep things "saucy".
Add the beans. Taste for salt and pepper.
When the grain is done, dinner is ready.
Serve the greens and beans on a bed of grain (or over toast), sprinkle the dish with cheese. Provide hot pepper flakes, lemon wedges and a fruity olive oil for garnishing.
Tuesday, January 27, 2009
A Pantry Pasta
 Another pantry-staple pasta dish. You can pull this together using what you have in the pantry and refrigerator. The only have-to-haves are some kind of pasta (shells or orchiette are preferred - stay in the short and chunky family), canned beans and tuna (I used ultra fancypants Italian oil-packed tuna last night, but a can of Starkist is fine too).
For crunch, I used some celery (you could use fresh bell peppers or turnip or jicama or what have you ...) and I had some scallions and dill in the fridge, so they got thrown in for freshness. Finally, I tossed in some capers for tang (try olives, giardinera or pickled onions) and chopped almonds (sub in breadcrumbs or toasted pinenuts) for crunch.
 This recipe is a common fall-back for me: it's easy to adjust based on what I have on hand, and it's fast (by the time the pasta ia cooked it's just about finished). I looked back through my archive and found this tuna and bean salad (which is basically this dish, sans pasta). Here's a version where I used orzo (violating my chunky pasta rule).
 So, at the risk of repeating myself, here's how you do it:
Pasta with Tuna and Beans
Serves four
- 1 pound pasta
- 1 8 ounce jar of oil-packed tuna, or 2 cans of tuna (olive-oil packed is best, but water-packed is ok)
- 4 ribs celery, chopped
- 1 can of beans
- 3 tablespoons capers
- 4 scallions, chopped
- 2 handfuls chopped dill
- 1 handful chopped toasted almonds
- olive oil
- salt and pepper
While the pasta is cooking, make the sauce: Saute the celery until a little softened. Add the beans, capers and scallions. When the pasta is cooked, drain it (reserving about a cup of cooking water) and add two-thirds of the pasta to the skillet (you may not need it all - add more until you have a pleasing combination of pasta and the other ingredients). Toss in the dill and almonds. Heat everything together, drizzling in a little cooking water to make the dish saucier if needed.
Season to taste with salt and pepper. Serve hot or warm.
Any leftover pasta can be used in a frittata.
Wednesday, January 21, 2009
Quick Creamy Pasta
 This was inspired by a post at Apartment Therapy (not that I live in an apartment) and I was reminded of a pasta dish I used to make often. It's a pasta with a cream sauce, but the sauce is pulled together from ricotta and a little pasta cooking water. It comes together right on the pasta and is super easy. If you use part-skim ricotta it's also much lighter than an alfredo or other cream sauce.
I used orchiette (little "ear" shaped pasta), but this would be good with any sauce-catching pasta like fusilli, gemelli or pennette. I had garlic confit, kalamata olives and sun-dried tomatoes in the fridge - so that's what went in. I also used the beet greens from a bunch of beets I'm putting in borscht tonight.
You could use any combination of vegetables and pickled thing - just use whatever you've got in the fridge. I listed a few suggestions for you at the end of the recipe.
Pasta with Olives, Tomatoes, Beet Greens and Garlic
serves 4
- 1 pound of orchiette, fusilli, gemelli or pennette
- 2 cups of chopped beet greens
- 1/2 cup sun-dried tomatoes
- 1/4 cup garlic confit (about 1 head of roasted garlic)
- 1/4 cup kalamata olives, pitted and torn into pieces
- 2 cups part-skim ricotta cheese
- parmesan cheese, for serving
While the pasta is cooking, make the sauce: In a large skillet, saute the beet greens in a little olive oil until wilted. Add the tomatoes, garlic and olives. Saute until everything is warmed through and fragrant. Add the ricotta to the pan and stir it in to make a sauce-like mixture. The sauce will stay a little grainy because it's ricotta. (If you want a smooth sauce, you can blend the ricotta in a food processor to smooth it out - to me, that's a but much for a weeknight dish.)
Reserve about one coffee mug's worth of water from the pasta pot. When the pasta is done, add the pasta directly to the pan with the sauce. Add pasta water to the pan as needed, to make the mixture "saucy". Taste for salt (you may not need any because of the olives).
Serve topped with a little parmesan cheese and freshly ground pepper.
Other flavor pairings:
- Shredded radicchio, capers, caramelized onions
- Baby spinach, crumbled bacon, cherry tomatoes
- Roasted butternut squash, chopped fresh sage, sauteed red onion
- Cooked sausage, roasted peppers, capers
Friday, January 16, 2009
Green Vegetable Curry
 Thank you everyone for responding to the survey. Unsurprisingly, meals in under 30 minutes won (edging out under 45 minutes by three votes).
The dinner I pulled together last night is a great speedy dinner. To make it, you rely on several pantry staples and it's very easily adapted to whatever meat and vegetables you have on hand.
The basic method is one I outlined in this post: Curry in a Hurry. The curry I made was a green curry with sweet potatoes, red peppers, cabbage and watercress. I served it over a bed of brown basmati rice. It was perfect for a cold winter night.
These are the steps I followed to prepare dinner:
- Started the rice. While it was cooking I made the curry.
- In a saucepan, I sauteed a few teaspoons of curry paste (Thai Kitchen Green Curry). When it was fragrant (about 30 seconds), I stirred in a half can of coconut milk, 2 cups of water and one light boullion cube (I was out of chicken broth).
- I added a cubed sweet potato to the pot and brought it to a simmer.
- When the potato was just cooked through (10 minutes), I added some sliced red peppers, a handful of chopped scallions, 2 handfuls of sliced savoy cabbage, a few shakes of fish sauce and a squeeze of lime.
- When the rice was cooked (about 20 minutes), I spooned some rice into serving bowls. I topped it with some chopped watercress and sliced shallots.
- I ladled the curry over the rice. Done!
Tuesday, December 30, 2008
A Delicious Treat from the Mediterranean Coast
 This is a pan of farinata (if you're on the Ligurian coast) or socca (if you're in Nice). It's basically a crepe made of chickpea flour, salt, water and a touch of olive oil. This was part of an Italian dinner that also included sauteed escarole and a few slices of salami and mortadella.
I was introduced to socca through Julia Child (one of her cookbooks of course: From Julia's Kitchen) and still use her basic proportions to make the batter. I baked mine in a very hot oven, but for a more authentic flavor you can make your farinata on a very hot grill or in your fireplace: in Liguria, we saw huge wood burning pizza ovens that were used to make farinata. There farinata is sold by weight, in huge slices scraped up from the enormous pans (30 inches across, at least) it's baked in.
I had the good fortune to dine at Rose Pistola restaurant in San Francisco several times. Rose Pistola specializes in Ligurian cuisine. The chef, Reed Hearon, prepares a traditional farinata and versions with additional flavors. I took inspiration from him for this batch and added torn oil-cured olives and chopped marjoram.
Farinata is insanely easy to make. The most challenging part of the process is finding the essential chickpea flour. Your local Italian market may have it and Indian markets definitely do. (In Indian markets it may be labeled besan flour).
Farinata
Serves 2-4 (in our house this serves two as a main-course side dish)
- 2/3 cup chickpea flour, sifted if lumpy
- 1 cup water
- 1/2 teaspoon salt
- 2 tablespoons olive oil, plus more for the pan(s)
- additional flavorings (optional): no more than two of: chopped herbs, cut or torn olives, anchovies, shredded radicchio, etc.
About 30-45 minutes before baking the farinata, select your pan(s): This quantity of batter will make a thin 12" crepe or two 8" crepes, or a thicker 10" crepe. I prefer thinner crepes, but thicker seems to be more traditional. Cast iron or steel are best, do NOT use non-stick.
Now that you've made your pan selection, heat that sucker up: Put it in a 400-degree oven and let it heat for about 30 minutes.
Pull the hot pan out of the oven and drizzle a little olive oil into the pan. Pour the batter into the pan, if necessary, swirl the pan to cover the bottom with the batter. Scatter the flavorings over the top, if you're using them. Put the pan into the oven and bake until the farinata is set, about 5 minutes. Turn on the broiler and broil until the farinata is golden brown in spots and a little burned in others, about 3 minutes (depending on your broiler).
Remove the pan from the oven and sprinkle the farniata with salt. Serve the farinata in rough slices: use a spatula or scraper to pull the slices off the pan (they shouldn't stick) - this will not be a graceful presenation.
Sunday, December 21, 2008
Scurvy-Fighting Slaw for a Snow Day
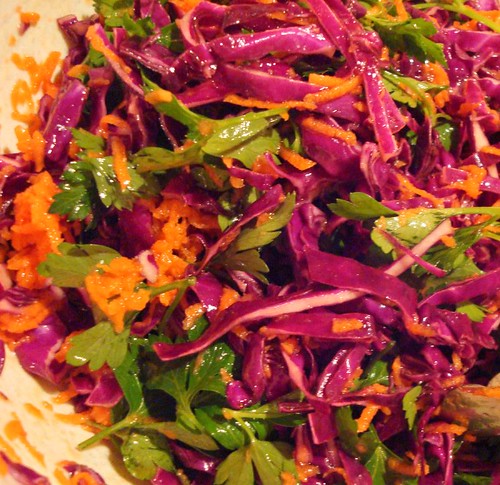 I haven't been able to make it to the supermarket in about a week. At this stage of the game, the larder is pretty bare and the produce supply is rather meager. Fortunately, several of my vegetable pantry staples were still in attendance.
When I'm craving salad, but am out of greens, I turn to some variation on a slaw. Tonight's version was a colorful concoction of red cabbage, carrots and parsley.
Scurvy-Fighting Slaw for a Snow Day
serves about 4
- 1 quarter of a head of red cabbage, sliced thin or shredded
- 3 carrots, peeled and grated
- 3 large handfuls of parsley leaves, large stems removed
- 1 orange
- olive oil
- red wine vinegar
- salt and pepper
Delicious, easy and healthful. A great companion to the corn and clam chowder we had for supper. Were I to serve this salad to "company" I would slightly increase the fussy factor and shred the cabbage very fine and pulled all the parsley into individual leaflets.
Wednesday, December 17, 2008
Little Nibbles of Cheddary Goodness
 If you still are looking for something to give to that person who has everything, may I recommend Cheez-Thats? Technically, they're just cheese crackers, but if you push the dough through your cookie press, you get little "Cheez-It"-like crackers. They are way better than Cheez-Its though, so I call them Cheez-Thats. Hee.
Mine are punched up with chipotle chili powder, so they have a spicy, smoky flavor. You can use a variety of spices to enliven these. Mustard powder and/or seeds would be an interesting addtion as would finely minced chives or cumin seeds. They're just fine plain too.
If you put them in a pretty bag, box or jar they make a lovely hostess gift. Package them alongside a bottle of red wine and you have a charming gift.
Cheez-Thats
(adapted from Paula Deen's Zesty Cheese Straws)
- 4 ounces (1 stick) butter, at room temperature
- 8 ounces sharp Cheddar cheese, shredded
- 1 1/2 cups flour
- 1/2 teaspoon salt
- 1/4 teaspoon chipotle chili powder, or cayenne, or smoked paprika (depending on how spicy you want these to be - taste the dough to see if you've put enough spice in)
- 1/4 teaspoon finely ground black pepper
Put all the ingredients into a food processor and process until you have a smooth dough. (Use a combination of pulsing and steady processing to make sure everything is well combined.)
You can do this without a food processor too - just cream the butter and cheese together with a spatula and then work in the flour and seasonings until you have a dough. In this method, you may have some threads of shredded cheese throughout the dough - that's a fine option as well
You can use a cookie press to form the crackers: Scoop the dough into a cookie press fitted with a ridged plate. Pipe out long strips of dough onto a baking sheet and then cut the strips into squares.
or
You can use the chill and slice method to form the crackers: Form the dough into a log (give it a square cross-section if you want to keep the Cheez-It metaphor going). Chill until firm and then slice into 1/8" thick pieces. Lay crackers on baking sheet.
Bake at 325 for about 10 minutes, or until gently browned. Your kitchen will be perfumed with the fragrance of toasted Cheddar cheese. The cheese flavor really shines at room temperature though, so hold off devouring them until they cool off.
Tuesday, October 28, 2008
Winter-Friendly Grilled Pizza
 With the cold weather starting to creep in, the pleasure Beppo and I take in certain outdoor cooking activities starts to wane. Don't get me wrong, we'll grill all winter long if we can (or until the snowdrifts cover the grill), but sometimes, we just don't want to stand out in the cold waiting for the perfect sear.
One item I really enjoyed cooking on the grill this summer was pizza. The flavor is great, the crust gets nice and crispy and I don't have to preheat my oven to "incinerate" for 45 minutes just for 8 minutes of baking. I recently bought a grill pan (a cheap one, at Marshalls, for about $20) and thought to give stovetop grilled pizza a try.
It worked really well, and with a little top-side broiling, the pizza was everything we wanted in a pie. Even better, no 45-minute oven-preheat, so I had our dinner on the table in less than half an hour. No smoky flavor, but that was an acceptable tradeoff. You could approximate smokiness with the gourmet's version of liquid smoke: smoked paprika sprinkled over the pizza.
Very rudimentary recipe for pan-grilled pizza
- 1 ball pizza dough
- 1 large grill pan or skillet (you could also do this in two or three smaller pans, or free form on a stove top grill)
- olive oil
- toppings of choice (don't put too much on: my pizza was topped with tomato paste, sauteed swiss chard, spicy olives and mozzarella and asiago cheeses)
Heat the grill pan until very hot. Drizzle on some olive oil. Drape the dough round into the pan. You should be able to flatten it out if it wrinkles; try to get it mostly flat in the pan. Reduce the heat to medium-high. Cook the dough round until the underside is crisp and speckled with brown.
Using tongs, flip the dough round over to cook the other side. Reduce the heat to medium to medium-low. (This depends on the thickness of your crust, you want it to cook through but not burn. The thicker the crust, the lower the heat.)
While the underside is cooking, dress the top of your pizza with your topping choices. When the bottom of the pizza is cooked (use your tongs to help you take a peek) and the crust is evenly golden, the pizza is done. I ran the pan under the broiler for about 5 minutes to get the cheese all nice and bubbly, but that's not a requirement.
Mangia!
Tuesday, September 30, 2008
Salad of Eggplant Two Ways
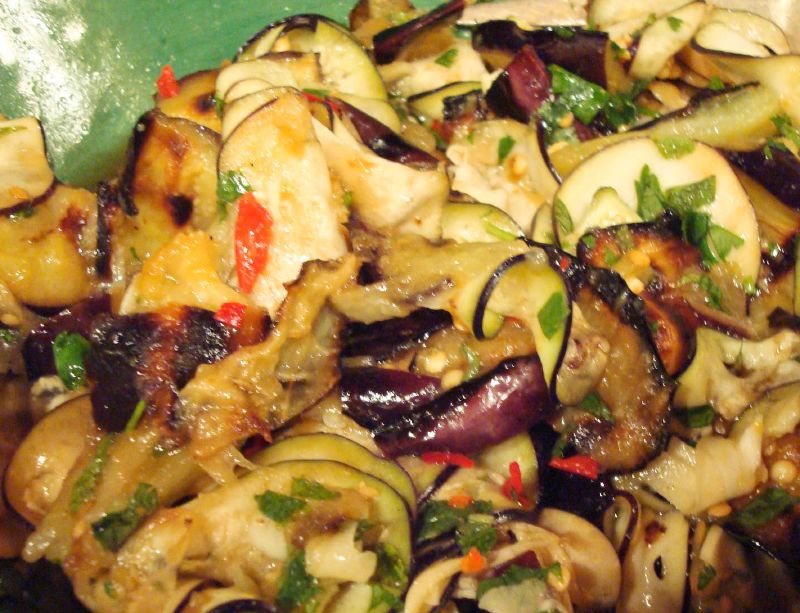 I'm going to to provide you with an outline for creating this salad as opposed to an actual recipe. This salad is made up of roasted and raw eggplant seasoned to your taste.
Try an Italian version with basil, tomatoes, and diced mozzarella. Or go Thai-style with lime, fish sauce, cilantro, mint and chilies. How about Indian, with lemon, cilantro, chilies, and toasted mustard and cumin seeds? There are so many ways to try this. Just remember that there will be a slight bitterness from the raw eggplant that you'll need to counteract with the flavors you use (acid and/or sugar).
This salad was inspired by an appetizer we had at B&G Oysters in Boston's South End. It was a salad of roasted and raw(!) eggplant topped with a lemony vinaigrette, oh and a huge seared scallop. I was shocked by how good the raw eggplant was in the salad and decided to try it at home.
Proportion-wise, you'll want about 75% of the eggplant to be roasted slices. The remainder is very thinly sliced raw eggplant. Use very small, firm, fresh eggplants - especially for the raw slices. Toss the eggplant with seasonings and dressing to taste. If your dressing is sufficiently acidic the raw eggplant won't discolor much at all.
Give this dish a try while you can still get fresh local eggplant.
Thursday, September 4, 2008
Weeknight Pasta with Vegetables
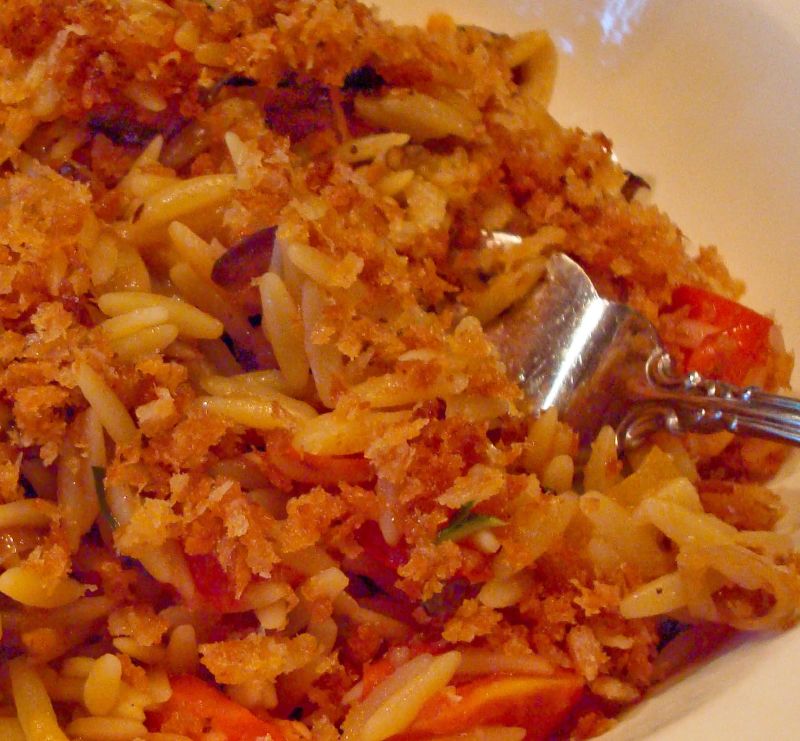 Nothing special last night, just a quick dish of pasta with vegetables. (Crappy food styling again - I swear there's basil in this dish. I was hungry.)
A few tips for when you're in a hurry for dinner and pasta's on the menu:
- Use small pasta shapes. It's sorta logical: smaller, thinner pastas will cook faster. Think angel hair instead of spaghetti, orzo instead of penne.
- Set the water to boil as soon as you think about dinner. Water always takes ages to boil. Get it going.
- Cut your veggies into small pieces. See pasta size logic above. Small, even-sized pieces are best.
- Give your dish a baked pasta feeling without the oven: toast some breadcrumbs to sprinkle over the top of the dish.
Serves two
- 8 ounces pasta
- 2 cups chopped eggplant, zucchini or summer squash
- 1 onion, thinly sliced
- 2 cloves garlic, sliced
- 2 cups chopped tomato
- handful of basil or parsley, coarsely chopped
- 1/4 - 1/2 cup breadcrumbs
- grated Parmesan
Toast the breadcrumbs in a hot skillet with a little oil until golden brown. Set aside.
When the pasta is done, drain it, reserving one cup of water. Over heat, toss the pasta with the vegetables, adding pasta water as need to make a slightly saucy dish. Toss in the basil or parsley, grated cheese and salt and pepper.
Before serving, sprinkle with toasted breadcrumbs.
Saturday, August 30, 2008
Labor Day Coolers
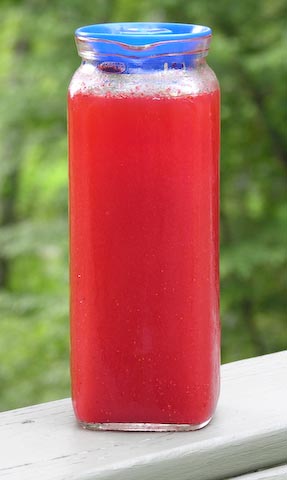 If you're having folks over for a cookout this weekend, may I recommend a fun beverage?
Aguas frescas ("fresh water") are Mexican and Central American drinks that are an ideal pairing for grilled or spicy foods, especially on a hot day. Traditionally aguas frescas are made from fruit, vegetables and grains. For our discussion, I'll stick to fruit-based aguas frescas.
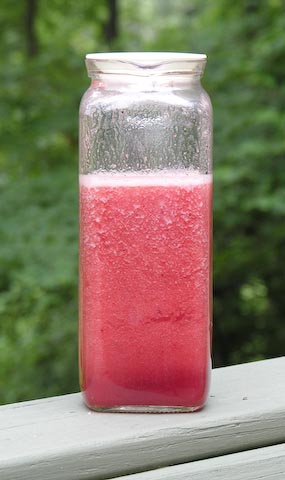 The technique is simple: puree cut-up fruit with with water until smooth (let your blender run for a minute at least). Add a little lemon, salt or sugar to taste. The texture should be smooth and watery - an agua fresca should be on the watery end of the spectrum, not the juicy/pulpy end. Dilute your puree with more cold water if needed to get a drinkable consistency. Serve your agua fresca very cold.
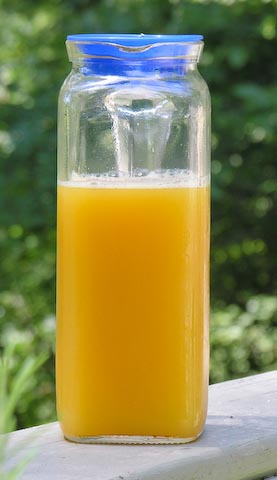 An agua fresca is an ideal way to use up dead-ripe fruit. You can also use the fruit purees you find the freezer case (Goya sells passionfruit, mango, guabana, and other exotic-to-me fruits). Some fruits (peaches, nectarines, plums) will start to brown after they've been pureed. Add extra lemon to these, but drink them the same day you make them for best visual results.
These aguas frescas are made from strawberry, plum, passionfruit and blackberry purees. Good fruits for you to try:
- Cantaloupe or Honeydew
- Peaches or Nectarines
- Strawberries, Blueberries, Blackberries
- Watermelon
 I may be stating the obvious, but ... these drinks are wonderfully refreshing on their own, but it won't be a tragedy should some tequila or rum happen to fall into your glass.
Friday, August 29, 2008
Skillet Souffle
 I was going to make a souffle for dinner but I waited too long to get started on supper. I remembered this recipe and thought it might work instead.
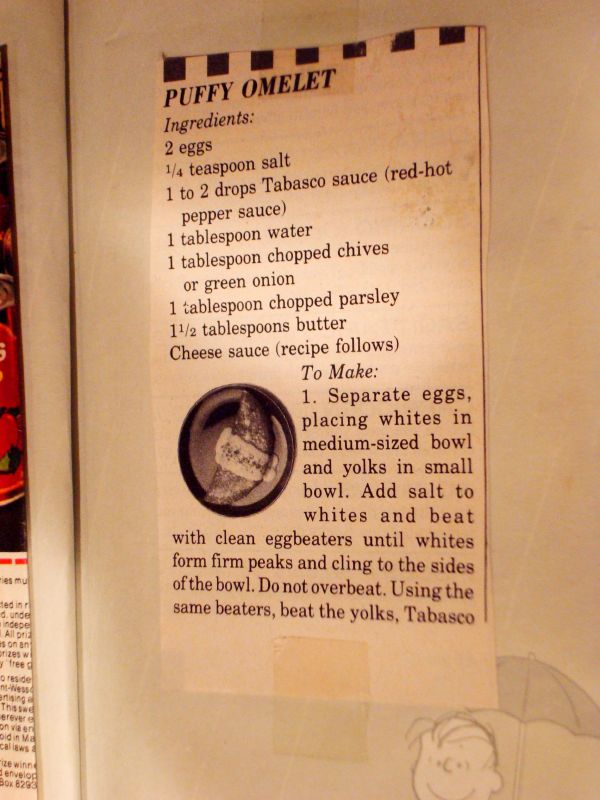 This recipe is one I must have clipped back in the early eighties (I think it's from Young Miss magazine and it's in my first "Recipe Book", taped next to a cookie recipe from a 1978 issue of Family Circle). You make it by whipping egg whites to stiff peaks and then folding in the egg yolks, herbs and salt and pepper. You then pour a cheese sauce over the omelette. (I used to make this version for myself in junior high and high school.) To make it lighter and simpler, I thought I would just fold the cheese into the eggs instead of making a sauce.
This version worked well. It was much faster than a traditional souffle and I'll definitely be trying this method out with other cheeses (I used cheddar today) and will also try adding in more flavors (like finely chopped spinach or ham). This omelette will be a lot prettier if made in a small skillet. I used a 10" skillet to make enough for two. It worked out ok, but I lost some beauty points since I had to flip the omelette in four pieces.
Skillet Souffle (Puffy Omelette)
Serves 2-3
- 4 eggs
- 1/2 cup grated cheese (nothing too runny: cheddar, Monterey jack, or parmesan are all good choices)
- 2-3 tablespoons minced herbs (parsley, thyme, rosemary, chives, cilantro, etc.)
- pinch of cayenne or dash of Tabasco
- 1 tablespoon butter or olive oil
- salt and pepper to taste
 Separate the eggs, placing the whites in a large bowl and the yolks in a smaller bowl. Using an electric mixer, or a strong arm and a whisk, beat the whites to stiff peaks. (See picture to the right.)
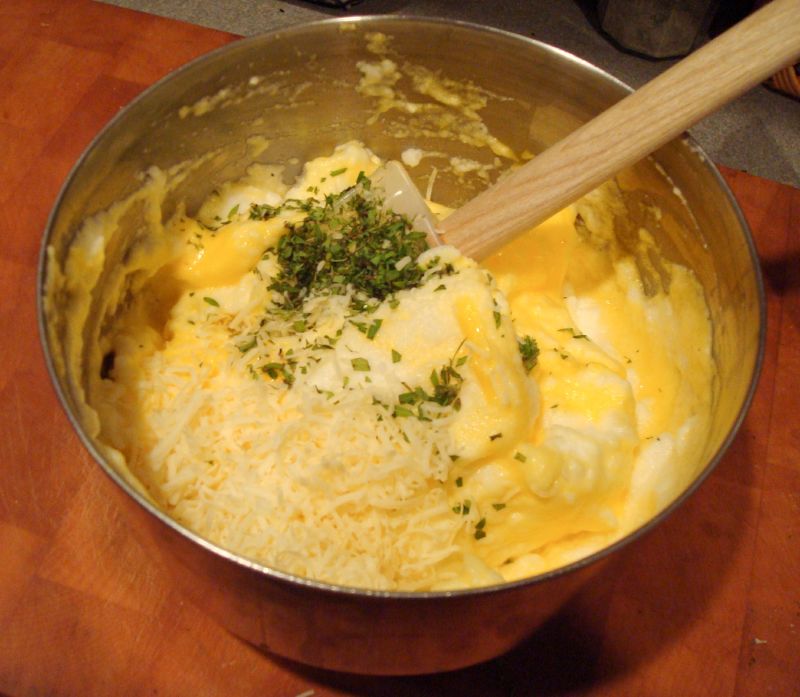 Gently beat the yolks with a pinch of salt and few grinds of pepper. Fold the yolks, grated cheese and herbs into the whites.
Meanwhile heat a non-stick 10" skillet over medium heat. Add the oil or butter to the skillet. Heat the skillet is hot, pout the egg mixture into the pan. Cook for 1-2 minutes, until the bottom of the omelette is set.
Now the hard part: flipping the omelette. I had to cut the omelette into four pieces with my
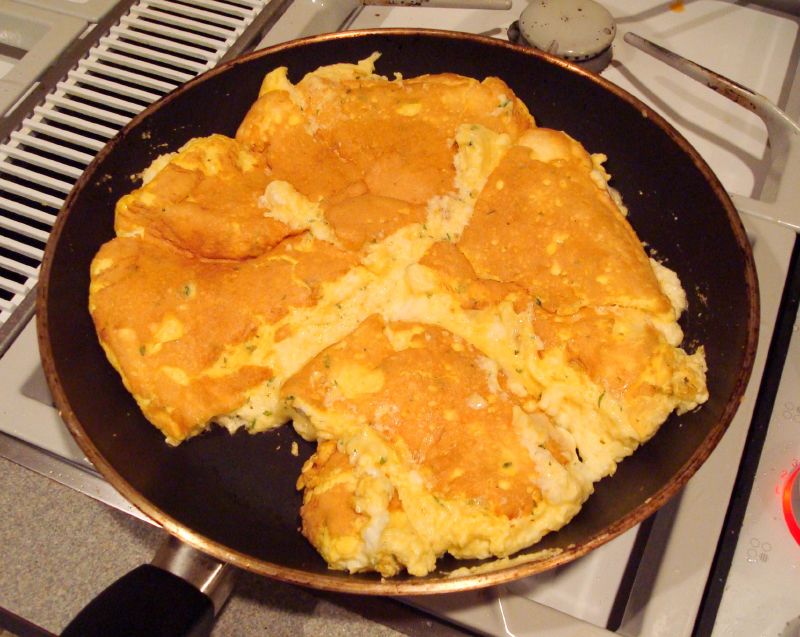 spatula and then flip each one. This resulted in a relatively unattractive presentation. (What I will try next time is sliding the omelette onto a plate, inverting the skillet over the plate, and flipping.) Cook for another 3-5 minutes, depending on how firm you like your eggs (for a souffle-like texture, go for the shorter cooking time).
This makes a very nice supper for two or three people. If you're dining alone, make a half portion in a 6" or 8" skillet.
Wednesday, July 2, 2008
Zucchini Pasta with Fresh Ricotta
 This dish was totally inspired by Deb's Zucchini Stand Pasta over at Smitten Kitchen. Of course, she was inspired by Michael Chiarello, so we're all just passing along a good thing for every one to enjoy.
Small changes I made to Deb's adaptation: I had fresh chive oil in the refrigerator (who doesn't?) so I used that and I also thought it would be pretty snappy to steam some chive strands and let them mingle through the pasta (they're in there, I swear, but I'm still working on my food styling skills). Finally, I had some home made ricotta, and I thought it would be pretty wonderful to drop a dollop on top.
Zucchini Pasta with Fresh Ricotta
serves two
- 8 ounces whole wheat spaghetti (I like Bionature brand)
- 8 ounces zucchini
- handful of chives
- 3-4 tablespoons of chive oil (or another flavored oil - see below)
- 1/4 cup fresh ricotta cheese
Boil the pasta in heavily salted water. After about 6 minutes, place the zucchini and chives in a steamer basket and steam them over the boiling pasta (alternatively, steam them in a separate pot for about 2-3 minutes). Drain the pasta, reserving a little cooking water, when it's cooked al dente and toss with the zucchini, chives and chive oil. Add up to 1/2 cup of cooking water to make the dish saucier, if necessary.
Serve in individual bowls, topped with a spoonful of ricotta. Twirl a little ricotta into each bite as you eat the pasta or stir the ricotta into your bowl instead.
Chive Oil
- 1/2 cup grapeseed, canola or some other mild-flavored oil
- 1/4 cup chopped chives
Monday, June 16, 2008
Mimosa: Not Just for Brunch
 (With apologies for the rerun picture.) When you hear the word "mimosa" what do you think? If you're like most people, a champagne and orange juice cocktail comes to mind.
 Well, there's another kind of mimosa, and I recommend you add it to your repetoire. Mimosa is a traditional French garnish: technically it's just grated hardboiled egg yolks. But, most recipes I see nowadays call for the whole egg to be grated or finely chopped and served over a steamed or boiled vegetable with a vinaigrette.
Asparagus mimosa is a nice way to serve asparagus that's easy, delicious and a little different. In this picture, the steamed asparagus has been tossed with a sherry-mustard vinaigrette and then sprinkled with the egg along with chives and chive blossoms.
I grate my egg on the fine holes of a box grater. You can also chop it finely, or push it through a mesh strainer, what ever's easiest for you. One egg provides enough garnish for 2 pounds of asparagus.
Subscribe to:
Posts (Atom)