Hey all! Here's my first instructional video: filmed and produced by the great folks at How 2 Heroes, it's my first foray into film. Agua frescas are really easy to make and are super for summer. Cheers!
Saturday, May 9, 2009
Friday, May 8, 2009
Drink of the Week: The Rosita
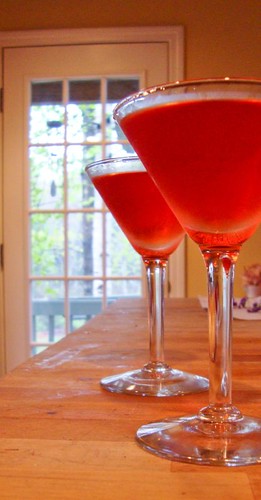 I was looking for a tequila drink to celebrate Cinco de Mayo with, but the 5th was rainy and cold and very un-Margarita-like. Adam @ the Boston Shaker (Your Friendly Neighborhood Cocktail Supply Shop) to the rescue! He twittered (tweeted? still working on my Twittercabulary) about a drink called the Rosita and after reading the recipe at DrinkBoy, I headed straight to the liquor cabinet to mix one up.
The unusual pairing of Campari with tequila may stop some of you in your tracks, but the combination works really well. The other ingredients mellow the Camapri's bitterness: it's still there, but it plays more of a backing role instead of muscling through all the other flavors (as it sometimes does in a Negroni).
The Rosita
In an iced mixing glass, combine:
- 1 1/2 ounces tequila
- 1/2 ounce Campari
- 1/2 ounce sweet vermouth
- 1/2 ounce dry vermouth
- dash of Angostura bitters
If this is still too Campari-heavy for you, reduce the amount to 1/4 ounce and work your way up to a level of bitterness that works for you.
Thursday, May 7, 2009
Review: Oceanos Oyster Bar & Sea Grill
 Oceanos Oyster Bar & Sea Grill
2-27 Saddle River Road, Fair Lawn, NJ 07410
201-796-0546
Accepts all credit cards.
This past weekend, Beppo and I headed down to New Jersey for my niece's baptism. The reception was held at Oceanos. I have been to this restaurant a few times and have always been pleased.
The executive chef and owner Peter Panteleakis takes a lot of care with the quality of his food, especially the seafood. His level of involvement extends to his daily baking of the day's bread (from his own starter, no less) after he has gotten back from his trip to the Fulton Fish Market.
By way of full disclosure, my father and his wife are friends of the owners so we always get a great greeting and very personalized service. That said, I was extremely impressed by the exceptional service our party of 30+ got at the reception. It's not easy to take care of a large group and they did a great job. I also watched the servers taking care of other tables and the diners seems happy and cared for.
On Sunday, I met my dad and wife for lunch and we ended up back at Oceanos. We frequently have the same type of meal: salad, fish and dessert, so I can't really describe much else from the menu.
At the reception, we did have the collection of Greek spreads (taramasalata, ktipiti: a feta spread, hummus and melanzanasalata: an eggplant salad) served with grilled pita and they were fantastic. Highly recommended.
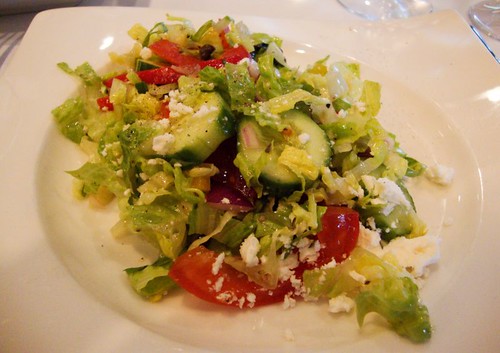
The Greek salad is great. Shredded romaine, tomatoes, red peppers, olives and feta are dressed with a nice lemony salad dressing. With the fresh house-made bread, it makes a great starter.
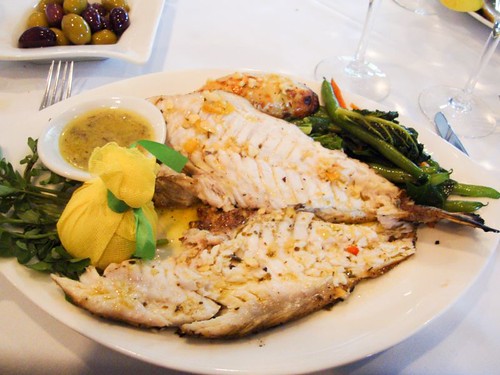 Oceanos prides itself on the the food it serves, especially the seafood. When we arrive, my father always consults with Peter as to what's best (or most interesting or unique) on the menu that day. You can do that too and I recommend you do so. Your fish (depending on what's available, you can get one for the table or your own fish if not everyone wants the same thing) will be grilled in the kitchen and brought to the table butterflied, deboned and sans head (no worries about your dinner looking at you). The sides are pretty standard: vegetables, potato and an oregano and lemon sauce. Fresh fish cooked this way is great: the flesh is sweet, with just a hint of smokiness. The lemon sauce provides a great contrast but isn't actually needed. We had white snapper which was a new fish for me. (By the way, check out those gorgeous olives - that's what olives should look like: plump, glossy and firm.)
We drank a Lazaridis Amethystos Drama 2007 with the meal. A lovely wine from the North of Greece, it's a sauvignon blanc/semillon blend. It was served at the perfect 50 degrees and was a great pairing for the salad and the fish. The Oceanos wine list is reasonably long (very heavy on California wines and with an extensive selection of Greek bottles) and very reasonably priced, with a good number of wines in the $25-40 price range.
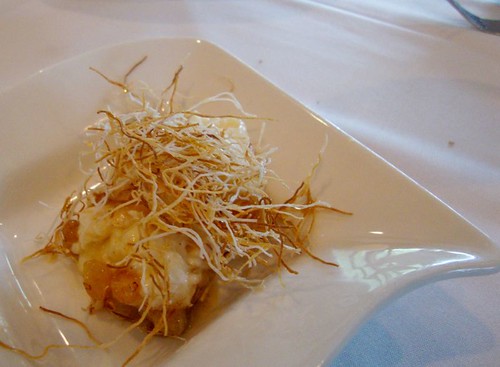 Finally, dessert. Oh my lordy. I'm not really a dessert person so I usually take a few bites to be polite. Peter suggested that we finish our meal with rice pudding (risogalo). Rice pudding is not something I normally get excited about it, but I am still thinking about this one. This picture is my little dish of rice pudding; we had been served family-style so we each could take as much as we wanted.
First the rice pudding itself was creamy and sweet, but not overly so. It was topped with toasted kataifi (similar to shredded phyllo) and golden raisins that had been plumped up with a caramel syrup. I made sure each bite contained the contrasting textures of the creamy rice pudding and the crunchy kataifi and the slightly tart punch of the raisins. This dish is what rice pudding should be.
I was already impressed with what a great place Oceanos is (if we lived four hours closer, I think we'd be regulars), but when we complimented the coffee, Peter completely blew my mind (in the best possible way). Restaurant coffee is frequently an afterthought: it's the cup that wakes you up enough to get you home after dinner, but I seldom think "wow, that's good coffee". This coffee was remarkably good and didn't need the cream and sugar I normally have to add to restaurant coffee to make it drinkable. Peter told us that his coffee is a custom-roasted brew from Allann Brothers. He buys whole beans, grinds them as needed and then (this is where he won my heart) he brews into thermal carafes. And then, if it's not all served, the coffee is discarded after 20 minutes of sitting around. This results in a brew with very little bitterness or oxidation. It can't be cheap for him, but it's fabulous for the customers.
This is a guy who cares about quality. A lot. Please give this restaurant a try if you're nearby I know you'll enjoy. His menu of regular dishes (but not specials) is online - take a look, there's something for everyone. I didn't see the check, so I don't know what the total was but the online menus have actual pricing, so you can estimate costs for yourself.
Monday, May 4, 2009
Easy Eating: White Bean Salad
 I put this salad together for the Encased Meats Festival that Linsey over at Cake and Commerce hosted a few weeks ago. I wanted something to provide a contrast to a gyro-style sausage that I'd made. The creaminess of the white beans is set off really nicely by chunks of cherry tomatoes, Kalamata olives and dill. I used a simple red wine vinaigrette as a dressing but a lemon-based dressing would be great too.
 I recommend that you cook your own beans for the salad if you can: they'll be a little creamier than canned and you'll be able to control the saltiness a little better. That said, if you want to use canned beans, go right ahead and feel no guilt about it. Of course, feel free to vary the ingredients based on what you have on hand.
This salad is best if you make it a few hours ahead. It makes a great side with grilled meat or vegetables. For an easy vegan dinner pair it with a green salad and a grilled portobello mushroom.
White Bean Salad
Serves 4-6
- 4 cups cooked white beans (about 1 1/2 cups dry beans cooked or 2 large cans of beans, rinsed and drained)
- 1 pint cherry tomatoes, sliced in quarters
- 3/4 cup Kalamata olives, pitted and torn in halves
- 1 bunch of scallions, sliced
- handful of dill, chopped
- red wine or sherry vinegar
- olive oil
- salt and pepper
Friday, May 1, 2009
Two Quick Sauces for Summer
 The summer grilling season approacheth. It's a good time to (re)introduce chimichurri to everyone. Traditionally, chimichurri from Argentina and Uruguay and is a sauce for grilled meats. What I love about chimchurri sauces is that they can be made ahead and kept as an insurance policy against boring food. You can also stir the sauces into a pasta salad or cole slaw or bean salad to jazz them up.
A parsley-based chimichurri is the version most people are familiar with. I just found a recipe for the red version of chimichurri. I can tell it's going to become a go-to condiment for me this summer: it's super easy to make and will keep in the fridge for a while.
Chimichurri (Green)
Yields about 2 cups
This is the version you're most likely be served. My version results in pesto-like version. If you prefer a looser consistency, adjust the sauce with more vinegar and oil.
- 4 cloves garlic, minced or pressed
- 1 bunch of parsley, leaves only
- 1/4 cup red wine vinegar
- 1/4 cup fresh oregano leaves(substitute 2 teaspoons dried oregano, or omit oregano entirely)
- 2 teaspoons crushed red pepper
- Kosher salt and freshly ground pepper to taste
- 1/2-3/4 cup extra-virgin olive oil
 Red Chimichurri (Chimichurri Rojo)
Yields about 1 cup
This yield a very liquid sauce, more like a salad dressing. I keep it in a squeeze bottle and give a squirt to dishes that need jazzing up.
Adapted from Norman van Aken.
- 1/2 cup sherry vinegar or red wine vinegar (the sherry vinegar results in a much more interesting sauce, but use a good red wine vinegar if that's what you have on hand)
- 1/4 cup virgin olive oil
- 1 1/2 tablespoons hot paprika (use half hot paprika and half smoked paprika for an interesting version)
- 2 teaspoons cayenne pepper (leave out if you don't want it to be too spicy)
- 4 cloves garlic, minced
- 1 teaspoon freshly ground black pepper
- 1/2 teaspoon kosher salt, or to taste
Monday, April 27, 2009
Daring Bakers April: Cheesecake Centerpiece
 The April 2009 challenge is hosted by Jenny from Jenny Bakes. She has chosen Abbey's Infamous Cheesecake as the challenge.
This month's Daring Bakers post was centered on cheesecake. We were given a free hand to flavor and decorate the cheesecake as we desired. I have to confess to not being a huge cheesecake fan, so I decided to highlight what I really enjoy about cheesecake: its tanginess and the contrast of the crust against the creamy cheese cake.
I've posted the recipe below for those who want to try it at home. I wasn't 100% happy with the recipe; I thought the result was too sticky and didn't cut cleanly, but based on the other cheesecakes I've seen posted others didn't have the problems I did (I'm still adjusting to my new oven and that may have been a factor.). My taste testers were extremely happy with the results however, so I consider the whole operation to be a success.
I did not make many changes to the recipe other than adding 3 lemons' worth of zest to the cheesecake batter.
 I topped the cheesecake with a thick layer of lemon curd and then piped meringue over the top. I pulled out my handy-dandy bruleeing torch and toasted the top for a lemon meringue pie look.
Here are all recipes I used:
Abbey's Infamous Cheesecake
crust:
- 2 cups / 180 g graham cracker crumbs
- 1 stick / 4 oz butter, melted
- 2 tbsp. / 24 g sugar
- 1 tsp. vanilla extract
cheesecake:
- 3 sticks of cream cheese, 8 oz each (total of 24 oz) room temperature
- 1 cup / 210 g sugar
- 3 large eggs
- 1 cup / 8 oz heavy cream
- 1 tbsp. lemon juice
- 1 tbsp. vanilla extract (or the innards of a vanilla bean)
- 1 tbsp liqueur, optional, but choose what will work well with your cheesecake
1. Preheat oven to 350 degrees F (Gas Mark 4 = 180C = Moderate heat). Begin to boil a large pot of water for the water bath.
2. Mix together the crust ingredients and press into your preferred pan. You can press the crust just into the bottom, or up the sides of the pan too - baker's choice. Set crust aside. (My note: TRIPLE wrap the pan with foil with save it from encroachment by the water bath.)
3. Combine cream cheese and sugar in the bowl of a stand-mixer (or in a large bowl if using a hand-mixer) and cream together until smooth. Add eggs, one at a time, fully incorporating each before adding the next. Make sure to scrape down the bowl in between each egg. Add heavy cream, vanilla, lemon juice, and alcohol and blend until smooth and creamy.
4. Pour batter into prepared crust and tap the pan on the counter a few times to bring all air bubbles to the surface. Place pan into a larger pan and pour boiling water into the larger pan until halfway up the side of the cheesecake pan. If cheesecake pan is not airtight, cover bottom securely with foil before adding water.
5. Bake 45 to 55 minutes, until it is almost done - this can be hard to judge, but you're looking for the cake to hold together, but still have a lot of jiggle to it in the center. You don't want it to be completely firm at this stage. Close the oven door, turn the heat off, and let rest in the cooling oven for one hour. This lets the cake finish cooking and cool down gently enough so that it won't crack on the top. After one hour, remove cheesecake from oven and lift carefully out of water bath. Let it finish cooling on the counter, and then cover and put in the fridge to chill. Once fully chilled, it is ready to serve.
Prep notes: While the actual making of this cheesecake is a minimal time commitment, it does need to bake for almost an hour, cool in the oven for an hour, and chill overnight before it is served. Please plan accordingly!
Lemon CurdThis recipe is taken from Elinor Klivans and I love it, check out the Fine Cooking post for helpful photos. The technique of whipping everything together and then heating it save you from whipping up a batch of lemon-scented scrambled eggs.
You'll end up with about two cups, which will be a little too much for the cheesecake, but leftovers are great on toast or scones or ice cream.
- 6 tablespoons unsalted butter, at room temperature
- 1 cup sugar
- 2 large eggs
- 2 large egg yolks (save the whites to use in the meringue)
- 2/3 cup fresh lemon juice
- 1 tsp. grated lemon zest
In a large bowl, beat the butter and sugar with an electric mixer, about 2 min. Slowly add the eggs and yolks. Beat for 1 min. Mix in the lemon juice. The mixture will look curdled, but it will smooth out as it cooks.
In a medium, heavy-based saucepan, cook the mixture over low heat until it looks smooth. (The curdled appearance disappears as the butter in the mixture melts.) Increase the heat to medium and cook, stirring constantly, until the mixture thickens, about 15 min. It should leave a path on the back of a spoon and will read 170°F on a thermometer. Don't let the mixture boil.
Assembling the cheesecake
Spread a layer of lemon curd over the top of the cheesecake. Pipe the egg white meringue over the top the cheesecake. Using a bruleeing torch toast the meringue until golden. If you don't have a torch, you can run the cheesecake under the broiler to brown the top.
Store in the refrigerator until ready to serve.
Remove the curd from the heat; stir in the lemon zest. Transfer the curd to a bowl. Press plastic wrap on the surface of the lemon curd to keep a skin from forming and chill the curd in the refrigerator. The curd will thicken further as it cools. Covered tightly, it will keep in the refrigerator for a week and in the freezer for 2 months.
Meringue topping
- 4 egg whites
- pinch salt
- pinch of cream of tartar
- 2 tablespoons sugar
Assembling the cheesecake
Spread a layer of lemon curd over the top of the cheesecake. Pipe the egg white meringue over the top the cheesecake. Using a bruleeing torch toast the meringue until golden. If you don't have a torch, you can run the cheesecake under the broiler to brown the top.
Store in the refrigerator until ready to serve.
Friday, April 24, 2009
Drink of the Week: Blueberry-Ginger Cooler
 I am sending thanks to the great folks at Domaine de Canton, who sent me a bottle of this delicious liqueur. I am having a lot of fun experimenting with it! This is the second drink I feel is ready for public viewing and consumption. The current working name is the Blueberry-Ginger Cooler, but I am open to suggestions for a better name.
This drink uses blueberry puree. I had a small amount of puree left over from a video shoot (eek!) I just finished with How 2 Heroes (videos coming soon). To make your own, puree 1/2 cup of blueberries (frozen are perfect for this) with 1/2 cup of water. Alternatively, for a more rustic approach, just muddle some berries (a small handful) right in your mixing glass.
I used tequila in this version, but I think a light rum might be nice too. Also, I tried a small variation and added a wee bit of red wine vinegar (1/4 ounce) to the drink in a small play on a shrub (a fruit, sugar and vinegar cooler - don't knock 'em till you try 'em).
Blueberry-Ginger Cooler
In an iced mixing glass, stir together until well-chilled:
- 2 ounces Domaine de Canton liqueur
- 1 ounce tequila
- 2 ounces blueberry puree
Tuesday, April 21, 2009
Turkey Tacos
 This is a multi-stage recipe (for which I only have one picture, unfortunately), but I thought it was worth sharing with you.
 Way back when in November, I bought a locally-raised turkey. Since we didn't need a whole bird just for our little Thanksgiving, I carved off the leg pieces and wings and put them in the freezer until later ...
... many months later ... I found my bag of turkey bits in the deep freeze. I had read about confiting turkey legs and was hoping to save up enough chicken fat to try that technique with these. Despairing of that ever happening I decided to jump start the process by using olive oil and some pork fatback.
I seasoned the pieces with salt and pepper and let them rest in the fridge overnight. The next day, I put the turkey pieces, peppercorns, a head of garlic, and several bay leaves into my crockpot and covered them with oil. After eight hours of slow cooking, the pieces were cooked through and silky. The result was as unctuous as a duck confit and the legs were way too big to fry up in a pan. I pulled the meat off the bones and covered it in the oil.
Now, how to use up this bounty (about three pounds of meat) ? A few pieces got sauteed and served over a salad with a poached egg. A few more went into an omelet. A few more onto a sandwich. Oy, that's a lot of turkey meat I still have in the fridge. So, tonight the rest went into tacos.
Finally, a recipe. Here you go:
Turkey Tacos
serves 4
- 1 onion, chopped
- 3 tablespoons chili powder
- 1/4 cup tomato sauce (or not, I had it in the fridge)
- 3 cups cooked turkey meat
- Juice of 1 lime
- For serving: tortillas, sour cream, shredded cheese, shredded cabbage, sliced chilies, etc.
Serve with accompaniments of your choice.
Impromptu Carrot Soup
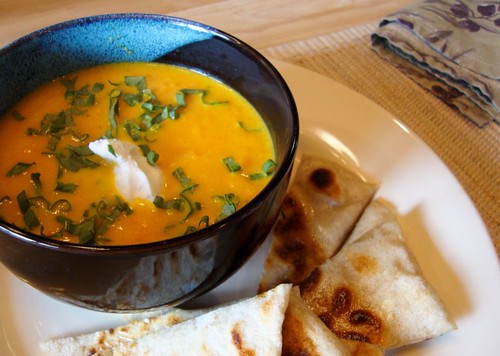 As I mentioned previously, Saturday was a pretty busy day what with making our bees at home. I did a fair amount of work outside as well and when it was time for lunch I was sorta stumped. A quick glance in the refrigerator inspired a speedy soup.
I had a monster bag of baby carrots on hand (leftovers from a large party). I hate baby carrots and knew we'd never get through that bag if we ate them raw. A soup seemed like the best option. I also had some left over orange juice from earlier in the week. Finally, the herb garden is supplying me with chives and sorrel.
I do love orange food, don't I?
Quick Carrot Soup
Serves 2-4
- 1 medium onion, chopped
- 3 pounds carrots, chopped
- 2 cups orange juice
- water
- Minced herbs for garnish
- Yogurt or sour cream for garnish
Bring to a boil and simmer until carrots are soft (about 10-15 minutes; the smaller your carrot pieces, the faster they'll cook). Use an immersion blender or regular blender to puree the soup, adding more water or juice if it's too thick.
Taste and adjust seasoning as necessary. Garnish with a dollop of yogurt and some fresh herbs.
Monday, April 20, 2009
No Menu for the Week of April 19
 So this is what we did this weekend. (Full set of pictures so far is here.)
This is why I didn't go shopping for food and why I have no set menu for this week. I have some leftover turkey not-so-confit, so tonight will be some sort of turkey taco, methinks. After that, I'm not so sure.
Review: 163 Vietnamese Sandwiches
 163 Vietnamese Sandwich 66 Harrison Avenue (near Beach Street), Boston, MA, (617) 988-8006
Open daily, cash only.
We went in to Boston yesterday to see a dance performance matinee at the Institute for Contemporary Arts. Since today is Marathon Monday, we thought traffic and crowds might make it tough to get in on time. So we decided to go in early and grab lunch. Beppo had a craving for banh mi and after a holler over on Twitter the Leather District Gourmet was gracious enough to share her recommendation: 163 [Vietnamese] Sandwich.
For those not familiar with these lovely sandwiches (they have gotten a lot of press lately). I was first introduced to them through an essay in John Thorne's wonderful book Pot on the Fire. The best banh mi (pronounced sorta like "bun mee") are made of a small, heated, fresh baguette spread with a mayonnaise-type spread and stuffed with meat or tofu and topped with fresh vegetables. They have become the darling of the foodie world for two reasons: they are usually very inexpensive and they are absolutely delicious!
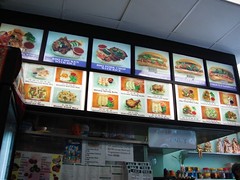 In my opinion, 163 Sandwich provides one of the better banh mi experiences in Chinatown. The tiny shop was packed with a mixture of students, locals and food-tourists like us. There were a number of helpful photos over the counter; a great feature for those who aren't conversant in banh mi options. They also offered a number of other choices (spring rolls and noodle salads and rice plates) which is nice when you're with a larger group and want to try a variety of options.
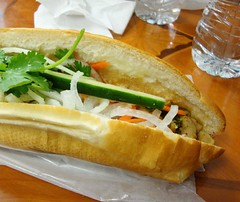 We ordered a curried chicken, a shredded pork and (for seconds) a barbecue beef banh mi. Each was topped with daikon, onion, carrot, cucumber, chilies (on request) and cilantro. The rolls were crusty and warm (I will say, at 8-9 inches, they were a tiny bit too big for the fillings, but that's a minor quibble).
The curried chicken filling reminded me a lot of "doubles", a curried chickpea sandwich from the Caribbean. I got mine with extra chilies and three hours later the corner of my mouth was still humming from the heat. Beppo ate both the pork and beef sandwiches and decided that the pork was his favorite of the two.
 These sandwiches and this setting are a great introduction to Vietnamese food for the tentative. The variety of flavors in each bite make for an exciting lunch or dinner option. These banh mi are priced from $2.75 to $3.00 each (those are not typos). Unless you're a huge eater, you can get a very satisfying lunch for three bucks! You can't even get a quarter pounder at McDonald's for that, and these sandwiches are so much more delicious and satisfying.
For those of you too far from a Chinatown to have a banh mi experience, here's a post from two years ago (OMG two years!) about homemade banh mi.
Saturday, April 18, 2009
Drink of the Week: Ginger-Nashi Cocktail
, A few weeks ago I had the great fortune to attend Cochon 555, an heirloom pig-feast and awareness event. One of the many other products available for tasting at the event was Domaine de Canton ginger liqueur. I had seen Domaine de Canton at bars and liquor stores and avoided it because I assumed it was a sweet, artificially flavored alcohol. Boy was I wrong.
Domaine de Canton is a liqueur made from Cognac and baby ginger. The flavor is floral, gingery, with hints of vanilla and spice from the cognac. It's much lighter than you might imagine and would be a great addition to your summer drinks lineup. My first introduction to it was at Cochon 555, in a watermelon mojito. 'Twas delicious and refreshing.
It's going to be fun to experiment with Domaine de Canton in summery, fizzy drinks, but for my first take on it I thought I would add it to Asian pear, or nashi, juice.
Making the juice was easy: puree one seeded and sliced Asian pear in the blender. Pour the pulp into a strainer and press gently to release juice. I got nearly 3 ounces of juice from one Asian pear. (Since the pulp was still pretty juicy, I saved it to use in pancakes.)
Ginger-Nashi Cocktail
In an iced cocktail strainer, combine:
The even proportions worked well for us because the Asian pear was so sweet. You may want to add more juice if it's not so sweet.
 A few weeks ago I had the great fortune to attend Cochon 555, an heirloom pig-feast and awareness event. One of the many other products available for tasting at the event was Domaine de Canton ginger liqueur. I had seen Domaine de Canton at bars and liquor stores and avoided it because I assumed it was a sweet, artificially flavored alcohol. Boy was I wrong.
Domaine de Canton is a liqueur made from Cognac and baby ginger. The flavor is floral, gingery, with hints of vanilla and spice from the cognac. It's much lighter than you might imagine and would be a great addition to your summer drinks lineup. My first introduction to it was at Cochon 555, in a watermelon mojito. 'Twas delicious and refreshing.
It's going to be fun to experiment with Domaine de Canton in summery, fizzy drinks, but for my first take on it I thought I would add it to Asian pear, or nashi, juice.
Making the juice was easy: puree one seeded and sliced Asian pear in the blender. Pour the pulp into a strainer and press gently to release juice. I got nearly 3 ounces of juice from one Asian pear. (Since the pulp was still pretty juicy, I saved it to use in pancakes.)
Ginger-Nashi Cocktail
In an iced cocktail strainer, combine:
- 1 oz. gin (a lighter, not-so-ginny gin like Plymouth is best and yes, vodka would be fine)
- 1 oz. Asian pear juice
- 1 oz. Domaine de Canton liqueur
The even proportions worked well for us because the Asian pear was so sweet. You may want to add more juice if it's not so sweet.
Thursday, April 16, 2009
Ouzo-Spiked Shrimp
 This is a great "what the heck's the dinner tonight?" dish. Everything you need to make it comes from the freezer or kitchen cabinet, if you've got a little fresh greenery for garnish, all the better!
 Ouzo-Spiked Shrimp
Serves 4
Recipe notes: I used ouzo to deglaze the pan and add a fennel flavor to the dish, but you can use white wine, rum, tequila or dry vermouth instead.
If you prefer, you can leave out the chickpeas and double the amount of shrimp.
- 1 onion, chopped
- 3 cloves of garlic, minced
- 1/4 cup ouzo
- 1 28 oz. can of plum tomatoes, tomatoes chopped or torn into pieces
- 1 15 oz. can chickpeas, drained
- 2 tablespoons capers
- 1/2 pound of shrimp
- minced herb for garnish, optional
Add the tomatoes to the pan. Bring to a simmer and let simmer until a little thickened. Taste for seasoning and add salt or pepper as needed.
Stir the chickpeas, capers and shrimp into the pan. Simmer until the beans are warmed and the shrimp are cooked through.
Serve with rice, pasta or a big hunk of fresh bread.
Monday, April 13, 2009
Week of April 12
 Here's a picture of some of the first flowers that bloom in our garden. The taller flowers are Hellebores. They are a wonderful addition to your garden: they grow in shade to part shade, are evergreen, and (beat of all!) they bloom in very early spring. The smaller flowers are Scillas and are a great flower to go under larger plants.
End of brief horticultural interlude ...
My fridge and freezer are full of a random collection of ingredients so I'm trying to clear out as much space as I can in advance of the growing season (wishful thinking). Plus, after my great visit to King Arthur I'm baking more bread, so I'm trying to make a lot of dishes in which the bread isn't an afterthought, but an integral part of the meal.
Menu for the Week
Sunday
Chicken in a mustard-cream leek and cabbage sauce
Mashed potatoes with green garlic
Monday
Shrimp and tomato stew (I'm going to for something cioppino-esque)
Homemade sourdough bread
Tuesday
Not home - I'm teaching a class on making fresh pasta
Wednesday
Yay, The Butlers are visiting!
Cowboy steaks
Grilled Caesar salads
Oven fried potatoes and sweet potatoes
Thursday
Turkey leg confit salad with fresh bread
Friday
Tomato soup and grilled cheese sandwiches
Sunday, April 12, 2009
Drink of the Week: Seelbach
 I was planning on posting this recipe on Friday night. But, as it is a champagne cocktail, it's actually an appropriate starter for your Easter dinner too. Note: this is our first outdoor cocktail picture of the year. It was a lovely, warm spring evening. (It's 34 degrees today. Ah, Spring, you fickle, fickle season.)
I was first introduced to the Seelbach at No. 9 Park, a really fabulous, high-end Boston restaurant carried it on their cocktail list when we were there a year or so ago. Its sweetness makes it a nice after dinner drink but the festive fizz from the champagne (and the gentle mule-kick from the bourbon) makes an appropriate apertif for a festive occassion. The history of the Seelbach is here.
On Friday, Dinner Party Download made the Seelbach their Drink of the Day. Seeing their tweet reminded me of what a lovely cocktail the Seelbach is so I put it into the rotation. By the way, The Dinner Party Download is a super-duper podcast, as they put it: "The Dinner Party Download is a fast and funny "booster shot" of unconventional news, cuisine and culture to help you win this weekend’s dinner party." They won my heart with that last phrase - dinner parties can seem like battlegrounds at times. The DPD is a funny, informative and quick hit of data. What other podcast gives you a drink recipe, an icebreaking joke, neat factoids and food and drink and cocktail party chatter?
Seelbach
Briefly stir together in an iced mixing glass, just to chill:
- 3/4 ounce bourbon
- 1/2 ounce Cointreau
- 7 dashes Angostura bitters
- 7 dashes Peychaud's bitters
Friday, April 10, 2009
Fear not the Souffle
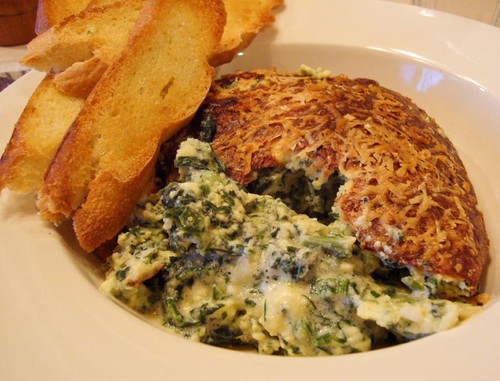 Souffles aren't that hard to make. Stop laughing. I promise you, if you can bake muffins, scramble an egg, or make macaroni and cheese, you can bake a souffle. It's even easier when you're baking that souffle as part of a casual dinner for you and your sweetie and not trying to impress dinner guests company. (You can impress dinner guests after you've practiced a few times.)
When preparing a classic dish like this, I feel it's best to turn to a trusted guide. Who's more trusted than Julia Child when it comes to classic French dishes? Julia's voice is so comforting and she's also realistic. In her book From Julia Child's Kitchen she outlines, in great detail (four full pages!), how to make a cheese souffle. In addition to Gruyere She mentions several other great cheese options including cheddar (which she says "... makes a fine souffle with excellent flavor, but it is a strictly American taste.")
I had extra filling from making spinach pie so I thought I'd make a spinach souffle for supper. With some toast and a little salad it was a delicious and comforting dinner. A nice thing about souffles: you don't need to buy a lot of expensive ingredients. Eggs, butter and cheese are pretty much all you need.
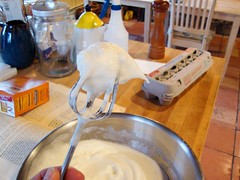 One note about beating egg whites: Many recipes that call for beating egg whites terrify the reader with cautions to not let a drop of fat or yolk touch the whites. They warn that that will result in whites that will not beat up to a full fluffiness. While I'm not saying you shouldn't be careful to keep your white clean, don't freak out about it. See these whites? I dropped some yolk in there while I was separating the eggs and decided to press on. Beautiful fluffy whites!
If you don't know how to separate eggs, I refer you to this video on How2Heroes.
This recipe looks long, but it really should only take you about 10 minutes to put into the oven. The more you do it, the faster you get.
Spinach Souffle
Serves 4-6
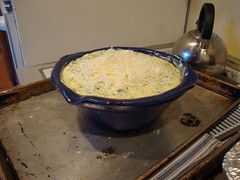
 A note on baking dish sizes: Julia recommends a traditional souffle dish: 6" across and 4" high. You'll need to put a parchment paper or aluminum foil collar on that dish to ensure that the souffle doesn't overflow. I use a dish that's just large enough to hold the batter. By not using a collar and using a large-enough dish, I get a good rise on the souffle without having the build a collar. For safety's sake - I always bake on a baking sheet in case it rises higher than I expected.
- 3 tablespoons butter
- 4 tablespoons flour
- 1 1/2 cups milk
- 1/2 teaspoon salt
- pinch of nutmeg, optional
- 1/2 teaspoon freshly ground pepper
- 6 eggs, separated
- 2 egg whites
- 1 1/2 cups finely chopped cooked spinach, squeezed as dry as possible
- 2 ounces parmesan cheese (Use 4 ounces if you're making a cheese souffle. I like cheddar, or a cheddar/parmesan mix - just keep the flavors on the stronger side)
- butter for greasing baking dish
- extra grated cheese for sprinkling over the top
 Melt the butter in a medium saucepan. Add flour and stir well with a whisk until smooth. Whisk in the milk gradually until it is all added in. You're making a thick white sauce, the whisking is essential as you don't want any lumps in the sauce. By adding the milk gradually you keep the sauce smooth. Check the seasoning on the sauce and add salt and pepper as needed.
Whisk the egg yolks into the sauce you've just made. Stir in the chopped spinach.
In a large bowl, beat the egg whites until they form soft peaks. Using a rubber spatula fold 1/4 of the whites into the sauce. Fold the now lightened sauce into the rest of the whites. As you're folding the sauce and whites together, sprinkle the cheese over the bowl, and fold the cheese in as well.
When everything is folded gently together pour it into the baking dish and sprinkle some additional cheese over the top.
Bake for 30-40 minutes until the souffle is well puffed and browned. If you're baking in a very thick dish (like I did this time - the dish's sides are easily 3/4" thick), this will slow down the baking and you may want to go longer: about 40-50 minutes.
Pull the puffed, lovely souffle from the oven and serve. If when you're served up you realize that the souffle isn't cooked through (might look raw) - don't despair. Spoon off the cooked layer and serve that. Just put the souffle back into the oven and cook for another 10 minutes or so, then just serve up a second course of souffle!
Wednesday, April 8, 2009
Springtime Projects
 Here's one of our springtime projects: we're adding to our menagerie this year with two beehives. We started building our hives last weekend. They come as kits and we decided to save a buck or two by assembling our hives.
We'll see how smart this decision was after I've finished assembling all sixty [honeycomb] frames.
Wednesday, April 1, 2009
Sweet Potato Gnocchi
 Here's my second entry into ATOM (A Taste of the Mediterranean). Every month the panel selects a country and dish as a basis for variation. This month's country is Italy and the dish is gnocchi. (As I was writing this post, I realized that I missed the entry date by a day - ah well, their loss = our gain.)
I've made traditional potato gnocchi many times and recenlty have really become a convert to pan-fried gnocchi. Instead of boiling the gnocchi, they are panfried and either sauced in the traditional manner (with a ragu, for instance) or served in or as a salad.
I'm on my own tonight so I thought I'd try this technique with sweet potato gnocchi instead (Beppo isn't a huge fan of sweets). I'd say the results were an unqualified success. The gnocchi fried up into fluffy little bites and I ate them up, dipped in spicy ketchup. This posting at Cookthink was an inspiration for my recipe.
Aside from roasting off the sweet potaotes, which I did a day ahead when the oven was on for something else, this recipe actually came together pretty quickly: about 20 minutes from idea to skillet. I didn't boil these gnocchi, so I can not vouch for their ability to hold together in boiling water.
Pan-Fried Sweet Potato Gnocchi
Serves 4-6
- 2 large sweet potatoes, baked until tender
- 2 eggs
- 1 teaspoon salt
- 1 teaspoon freshly ground pepper
- 1.5 - 2 cups flour
 Put the potatoes through a ricer or grater. Stir the eggs, salt and pepper into the potatoes. Add in half the flour and stir it in with a rubber spatula. Keep adding flour (press it in with the spatula) until you have a soft dough. It should hold together and not feel too sticky.
Roll the dough into thick ropes (about 3/4" inch around) and then cut it into inch-long pieces with a bench knife or table knife. Roll each piece (adding flour if things get sticky) down the tines of a fork (or on a butter paddle, like I do).
 After you've finished cutting and rolling gnocchi, you can fry them up. In a hot non-stick or cast iron skillet, saute the gnocchi over medium-high heat until browned well on both sides.
I ate mine dipping in spicy ketchup, but I think these wouldbe great with sage and brown butter, or tossed with crispy pancetta, asparagus and onion.
Tuesday, March 31, 2009
Event Alert: Five Little Piggies ...
 ... Went to market?
... In a poke?
... Constructing houses of questionable stability?
Nope. This Sunday evening at Cochon 555 Boston, five piggies will be prepared and served by five Boston area chefs and washed down with wines from five winemakers (See? Five pigs, five chefs, five winemakers: 555).
Cochon 555 Boston will be held at the Liberty Hotel and will highlight heritage pork dishes from:
- Tony Maws, Craigie on Main
- Jamie Bissonette, Toro Restaurant
- Matthew Jennings, Farmstead
- Jason Bond, Beacon Hill Bistro
- Joseph Margate, Clink Retsaurant
All the twittering and blogging I have seen about this event have really gotten me excited to attend. I have also had the good fortune to visit three of the chefs' restaurants and am really looking forward to tasting what they prepare for this event. The dishes will be judged by an august panel of Boston-area food-lovers, restaurateurs and food producers and one chef will be crowned the "Prince of Porc" at the end of the day.
I am concerned about the scrum that normally forms at the tables at events like this. You know how it goes: you elbow your way through the crowd, just to get a postage-stamp sized piece of something on a toothpick, which is then knocked off aforementioned toothpick by a someone's wildly gesticulating arms. However, this event has already run in New York, Seattle, Portland (Oregon), Atlanta and Napa, so I am hopeful that they've figured out the crowd control/Lord of the Flies issues that are so common at these events.
Product placement disclaimer: I have been granted a press pass for this event and am looking forward to reporting back on it for you. Many pictures will be taken, many dishes will be tasted.
Details
Cochon 555
The Liberty Hotel Boston
5:00 - 8:00, Sunday, April 5
Tickets are $125 and are still available. There is a $25 industry discount: use code "baconbits".
Future dinners coming soon to: Des Moines, Chicago, Washington, DC and San Francisco.
Sunday, March 29, 2009
Week of March 29
 What a weekend! Beppo and I had the good fortune to be invited to an "Eggstravaganza" (not the official name) at my new friend Linsey's house. I got there nice and early to help prep and had a grand time baking off brioche, portioning foie gras, and slicing miso-cured char. Later that day many delicious courses, each featuring eggs, were served to a group of hungry and enthusiastic guests. We kicked off the evening with Pisco Sours and much fun was had from there. For a full discussion and lots of pictures of the 24, 24, 24 dinner (sponsored by Foodbuzz), check out Linsey's lovely blog: Cake and Commerce.
Menu for the Week
Sunday
Cowboy steak (That's it up there on the right - nearly three inches thick. One steak serves three. And no, it's not made of actual cowboys.)
Broccoli di rapi
Roast potatoes with garlic and rosemary
Oven-fried onion rings (not bad at all, but not fooling anyone)
Cupcakes for dessert!
Monday
Chili-fried shrimp with scallions
Napa cabbage and shiitake mushroom saute
Steamed rice
Tuesday
Ubuntu's Yellow Eye Bean soup (I couldn't believe it, a New York Times recipe calling for a specific Rancho Gordo bean that I have in my pantry right now!).
Wednesday
Sweet potato gnocchi (this is an experiment - we'll see)
Sauteed spinach
Grilled portobello mushrooms with crispy pancetta and sage
Thursday
Chilaquiles topped with a fried egg (this version from Rick Bayless)
Black bean and avocado salsa
Friday
Red lentil soup (delicious and freezable!)
Friday, March 27, 2009
Trip Report: King Arthur Flour Baking Center
 I've been running my own business for a year now and have been doing a lot of professional exploration and development. As part of this, I thought it would be a great opportunity to take a class at King Arthur Flour's Baking Education Center. I hoped to take a professional-level class there last year, but due to their popularity and small class sizes I got boxed out of everything I wanted to take.
I just returned from the three-day class Running a Successful Bakery and had a wonderful, educational time. (My full Flickr set from the class is here.)
 The class is taught by Chef Jeffrey Hamelman. Chef Hamelman has thirty-plus years of baking experience and run his own bakeries as well as having been a CIA instructor. He's now King Arthur's Bakery Director (they run a full retail and wholesale operation at their headquarters in Norwich, Vermont).
 Chef Hamelman is a great teacher: he's got extremely high standards, a tactful and direct style, an encyclopedic knowledge of all things bread and pastry, and a great sense of humor. It was a rare experience to spend three days learning from him. He has written a remarkably complete cookbook called Bread: A Baker's Book of Techniques and Recipes. (I picked up a copy while I was there and am already fermenting several starters for breads in this book.)
An additional benefit of this class was the opportunity to meet so many other passionate bakers from around the country. Our class had fourteen students and they hailed from the East coast as well as California, Texas, and Indiana. The students' broad range and variety of experiences only added to the richness of the class experience.
 Class started promptly each day at 9:00. This class was unusual for the Baking Education Center in that it was about 60% lecture (about the business of running a bakery); other courses are much more hands on. That said, we still got to get deep into a french bread dough and brioche and croissant doughs as well. A number of us commented several times that one of the best aspects of the class was Chef's frequent tips and pointers on how to use product creatively and how to reduce waste. For instance, from one bread dough we made baguettes, batards (a large oval loaf), rolls and fougasse. From brioche dough, we made brioche Nanterre, tete brioche, brioche pastries with cherries, and a quiche-type dish called a flamiche.
 We were also treated to lectures by Tod Bramble (Bakery Food Service Sales Manager) and Mary Bihrle (VP Finance) and Patricia [I didn't write down her last name, sorry!] (Controller). Tod spoke about the intricacies of wheat growing and flour production. He was a great resource for us; it's essential to understand your ingredients, and for such an important one, flour always gets short shrift. Mary and Patty spoke with us about the financial side of running a business and shared their experiences with us.
 The class wasn't cheap (about $200 a day) but it was definitely worth the investment for the knowledge imparted by Chef Hamelman and for the opportunity to meet so many other bakers. I'm hoping to attend another class there later this year. The Norwich area is really beautiful - it's right near Dartmouth University so there are a fair number of tourist services available to area visitors.
Information about baking classes at the Center and nationwide can be found here.
Information about the Bakery is here.
My full Flickr set from the class is here.
Daring Bakers March: The Lasagna of Emlia Romagna
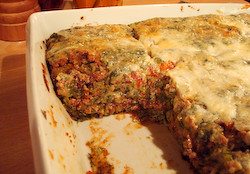 The March 2009 challenge is hosted by Mary of Beans and Caviar, Melinda of Melbourne Larder and Enza of Io Da Grande. They have chosen Lasagne of Emilia-Romagna from The Splendid Table by Lynne Rossetto Kasper as the challenge.
I'm a pretty recent Daring Bakers member, so it was a pleasant surprise to me to see a savory item go onto the challenge roster. We were to make a ragu, a bechamel sauce, and most importantly, fresh spinach pasta.
The recipes were taken directly from Lynne Rossetto Kasper's glorious book The Splendid Table. The recipes are challenging, but doable, and I strongly recommend you give this dish a try. The ragu can be made ahead and frozen and the pasta can be done earlier in the day and held before assembly.
Lasagne of Emilia-Romagna (Lasagne Verdi al Forno)
(Serves 8 to 10 as a first course, 6 to 8 as a main dish)
- 1 recipe Spinach Pasta cut for lasagna (recipe follows)
- 1 recipe Bechamel Sauce (recipe follows)
- 1 recipe Country Style Ragu (recipe follows)
- 4 ounces freshly grated Parmigiano-Reggiano
Working Ahead:
The ragu and the béchamel sauce can be made up to three days ahead. The ragu can also be frozen for up to one month. The pasta can be rolled out, cut and dried up to 24 hours before cooking. The assembled lasagne can wait at room temperature about 1 hour before baking. Do not refrigerate it before baking, as the topping of béchamel and cheese will overcook by the time the center is hot.
Assembling the Ingredients:
Have all the sauces, rewarmed gently over a medium heat, and the pasta at hand. Have a large perforated skimmer and a large bowl of cold water next to the stove. Spread a double thickness of paper towels over a large counter space. Preheat the oven to 350 degrees Fahrenheit. Oil or butter a 3 quart shallow baking dish.
Cooking the Pasta:
Bring the salted water to a boil. Drop about four pieces of pasta in the water at a time. Cook about 2 minutes. If you are using dried pasta, cook about 4 minutes, taste, and cook longer if necessary. The pasta will continue cooking during baking, so make sure it is only barely tender. Lift the lasagne from the water with a skimmer, drain, and then slip into the bowl of cold water to stop cooking. When cool, lift out and dry on the paper towels. Repeat until all the pasta is cooked.
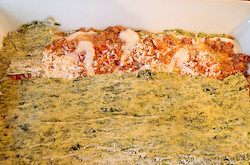 Assembling the Lasagne:
Spread a thin layer of béchamel over the bottom of the baking dish. Arrange a layer of about four overlapping sheets of pasta over the béchamel. Spread a thin layer of béchamel (about 3 or 4 spoonfuls) over the pasta, and then an equally thin layer of the ragu. Sprinkle with about 1&1/2 tablespoons of the béchamel and about 1/3 cup of the cheese. Repeat the layers until all ingredients are used, finishing with béchamel sauce and topping with a generous dusting of cheese. (I ended up with about six layers - you may have more or less depending on the thickness of your pasta.)
Baking and Serving the Lasagne:
Cover the baking dish lightly with foil, taking care not to let it touch the top of the lasagne. Bake 40 minutes, or until almost heated through. Remove the foil and bake another 10 minutes, or until hot in the center (test by inserting a knife – if it comes out very warm, the dish is ready). Take care not to brown the cheese topping. It should be melted, creamy looking and barely tinged with a little gold. Turn off the oven, leave the door ajar and let the lasagne rest for about 10 minutes. Then serve. This is not a solid lasagne, but a moist one that slips a bit when it is cut and served.
Spinach Egg Pasta (Pasta Verde)
Makes enough for 6 to 8 first course servings or 4 to 6 main course servings, equivalent to 1 pound (450g) dried boxed pasta.
- 2 jumbo eggs (2 ounces/60g or more
- 10 ounces (300g) fresh spinach, rinsed dry, and finely chopped; or 6 ounces (170g) frozen chopped spinach, defrosted and squeezed dry
- 3&1/2 cups (14 ounces/400g) all purpose unbleached (plain) flour (organic stone ground preferred)
Mound the flour in the center of your work surface and make a well in the middle. Add the eggs and spinach. Use a wooden spoon to beat together the eggs and spinach. Then gradually start incorporating shallow scrapings of flour from the sides of the well into the liquid. As you work more and more flour into the liquid, the well’s sides may collapse. Use a pastry scraper to keep the liquids from running off and to incorporate the last bits of flour into the dough. Don’t worry if it looks like a hopelessly rough and messy lump.
With the aid of the scraper to scoop up unruly pieces, start kneading the dough. Once it becomes a cohesive mass, use the scraper to remove any bits of hard flour on the work surface – these will make the dough lumpy. Knead the dough for about 3 minutes. Its consistency should be elastic and a little sticky. If it is too sticky to move easily, knead in a few more tablespoons of flour. Continue kneading about 10 minutes, or until the dough has become satiny, smooth, and very elastic. It will feel alive under your hands. Do not shortcut this step. Wrap the dough in plastic wrap, and let it relax at room temperature 30 minutes to 3 hours.
If using an extra-long rolling pin work with half the dough at a time. With a regular-length rolling pin, roll out a quarter of the dough at a time and keep the rest of the dough wrapped. Lightly sprinkle a large work surface with flour. The idea is to stretch the dough rather than press down and push it. Shape it into a ball and begin rolling out to form a circle, frequently turning the disc of dough a quarter turn. As it thins outs, start rolling the disc back on the pin a quarter of the way toward the center and stretching it gently sideways by running the palms of your hands over the rolled-up dough from the center of the pin outward. Unroll, turn the disc a quarter turn, and repeat. Do twice more.
Stretch and even out the center of the disc by rolling the dough a quarter of the way back on the pin. Then gently push the rolling pin away from you with one hand while holding the sheet in place on the work surface with the other hand. Repeat three more times, turning the dough a quarter turn each time.
Repeat the two processes as the disc becomes larger and thinner. The goal is a sheet of even thickness. For lasagne, the sheet should be so thin that you can clearly see your hand through it and see colours. Cut into rectangles about 4 by 8 inches (10 x 20 cm).
Dry the pasta at room temperature and store in a sealed container or bag.
Bechamel
- 4 tablespoons (2 ounces/60g) unsalted butter
- 4 tablespoons (2 ounces/60g) all purpose unbleached (plain) flour, organic stone ground preferred
- 2&2/3 cups (approx 570ml) milk
- Salt and freshly ground pepper to taste
- Freshly grated nutmeg to taste
Using a medium-sized saucepan, melt the butter over low to medium heat. Sift over the flour, whisk until smooth, and then stir (without stopping) for about 3 minutes. Whisk in the milk a little at a time and keep the mixture smooth. Bring to a slow simmer, and stir 3 to 4 minutes, or until the sauce thickens. Cook, stirring, for about 5 minutes, until the sauce thickens. Season with salt, pepper, and a hint of nutmeg.
Country Style Ragu’ (Ragu alla Contadina)
Makes enough sauce for 1 recipe fresh pasta or 1 pound/450g dried pasta).
I made mine batch of this in my crockpot - it worked perfectly for the slow simmer this sauce needs.
- 3 tablespoons extra virgin olive oil (45 mL)
- 2 ounces/60g pancetta, finely chopped
- 1 medium onion, minced
- 1 medium stalk celery with leaves, minced
- 1 small carrot, minced
- 4 ounces/125g boneless veal shoulder or round
- 4 ounces/125g pork loin, trimmed of fat, or 4 ounces/125g mild Italian sausage (made without fennel)
- 8 ounces/250g beef skirt steak, hanging tender, or boneless chuck blade or chuck center cut (in order of preference)
- 1 ounce/30g thinly sliced Prosciutto di Parma
- 2/3 cup (5 ounces/160ml) dry red wine
- 1 &1/2 cups (12 ounces/375ml) chicken or beef stock (homemade if possible)
- 2 cups (16 ounces/500ml) milk
- 3 canned plum tomatoes, drained
- Salt and freshly ground black pepper to taste
The ragu can be made 3 days ahead. Cover and refrigerate. It also freezes well for up to 1 month. Skim the fat from the ragu’ before using it.
Heat the olive oil in a 12 inch (30cm) skillet (frying pan) over medium-high heat. Have a large saucepan handy to use once browning is complete. Add the pancetta and minced vegetables and sauté, stirring frequently with a wooden spoon, 10 minutes, or until the onions barely begin to color. Coarsely grind all the meats together, including the prosciutto, in a food processor or meat grinder. Stir into the pan and slowly brown over medium heat. First the meats will give off a liquid and turn dull grey but, as the liquid evaporates, browning will begin. Stir often, scooping under the meats with the wooden spatula. Protect the brown glaze forming on the bottom of the pan by turning the heat down. Cook 15 minutes, or until the meats are a deep brown. Turn the contents of the skillet into a strainer and shake out the fat. Turn them into the saucepan and set over medium heat.
Reducing and Simmering: Add the wine to the skillet, lowering the heat so the sauce bubbles quietly. Stir occasionally until the wine has reduced by half, about 3 minutes. Scrape up the brown glaze as the wine bubbles. Then pour the reduced wine into the saucepan and set the skillet aside.
Stir ½ cup stock into the saucepan and let it bubble slowly, 10 minutes, or until totally evaporated. Repeat with another ½ cup stock. Stir in the last 1/2 cup stock along with the milk. Adjust heat so the liquid bubbles very slowly. Partially cover the pot, and cook 1 hour. Stir frequently to check for sticking.
Add the tomatoes, crushing them as they go into the pot. Cook uncovered, at a very slow bubble for another 45 minutes, or until the sauce resembles a thick, meaty stew. Season with salt and pepper.
Tuesday, March 17, 2009
Peanut and Pepper Stew
 This soup was inspired by this North African recipe. I made some minor modifications (mainly increasing the acidity with more lime juice and the heat with a squirt of sriracha) but the technique and basic recipe stayed the same.
Feel free to adjust this to your taste too. I think it would be super served over baked sweet potatoes or (sans rice) over a fried noodle cake with sauteed bok choy.
Peanut and Pepper Stew
(as inspired by a Flickr poster who was inspired by a Moosewood cookbook)
4-6 generous servings (this freezes well)
- 2 large onions, chopped
- 2 celery stalks, chopped
- 2 red peppers , chopped
- 3 cloves garlic, pressed or minced
- 1/4 teaspoon cayenne
- 1 tablespoon curry powder (if your curry powder is hot, you may want to reduce or omit the cayenne)
- 1/2 cup brown rice
- 14 ounce can diced tomatoes
- 1/4 cup peanut butter (smooth or crunchy, your choice)
- juice of one lime
- chopped cilantro, lime wedges, sliced scallions, toasted peanuts and/or sriracha for garnish
Add the rice, tomatoes and three cups of water. Add a pinch of salt. Cover the pan and bring to a simmer. Cook until the rice is tender, about 30-40 minutes. Whisk in the peanut butter, lime juice and season to taste with salt and pepper. Whisk in more water if the stew is too thick. Bring the acid/spicy balance up to your taste with more lime juice, hot sauce, salt and pepper.
Serve with your choice of garnishes.
Monday, March 16, 2009
A Savory Bread Pudding
 My mother-in-law sent us home from the holidays with a whole lotta challah (L: thank you again!). One loaf went into french toast production, as to be expected, but the other loaf has been sitting in the freezer waiting for me to get my act together.
I had an exceptionally good dessert bread pudding (butterscotch with salted caramel) at Eastern Standard a few weeks ago and it got me thinking about bread puddings in general. After reviewing recipes, I thought a savory option would be nice to try. Of course, I realized that I had already made a savory bread pudding before, I had just called it "strata".
So bread pudding or strata or whatever you want to call it, this is a great way to use up bits of vegetables, stale bread and ends of cheese. I used asparagus, caramelized onions, dill and goat cheese in this one. I can vouch for the breakfasty deliciousness of a sausage, ham and cheese version (thanks Doug!).
As I mentioned, I used challah in this version, but any delicious bread will do. It should be stale to keep things from getting too soggy. If your bread is too fresh, cut it into cubes and bake it in a 300-degree oven for about 10 minutes.
Savory Asparagus and Caramelizd Onion Bread Pudding
Serves 6-8 as a main course, more if served as a side dish
- 2 onions, peeled and sliced thin
- 1 large bunch asparagus, ends snapped off, stalks sliced into bite-sized pieces
- 1/4 cup minced dill or parsley
- 4 cups of 1-inch bread cubes
- 1/2 cup goat cheese, crumbled
- 5 eggs
- 2 cups milk
- 1/4 cup parmesan cheese
 In a large skillet, over medium-high heat, stirring frequently, saute the sliced onion until well-caramelized (this will take about 20 minutes). Put into a large bowl and set aside. In the same pan, saute the asparagus until cooked through and bright green. Add to the onions in the bowl.
Stir together the onions, asparagus, dill, bread cubes and goat cheese. Pour into a 9x9 baking dish (you can use a large dish, the pudding will be thinner, is all). In the same bowl, whisk together the eggs and milk. Season with a little salt and pepper. Pour the milk-egg mixture over the bread cubes in the baking dish (the dish should not be full to the top as the pudding will puff up to almost double its pre-baking height). With a spoon or spatula, push the cubes into the milk mixture. Let the dish sit for 15 minutes and then sprinkle the parmesan over the top.
Bake for about 45 minutes until browned and puffy. Let sit for about 10 minutes before serving (it will be insanely hot in the center when it first comes out).
Note: This can be made ahead (up to baking it) and held in the refrigerator overnight. The bread will soak up all the liquid, but don't worry. Cover with foil and bake at 375 for 30 minutes, then uncover and bake for another 15-30 minutes (until hot all the way through).
Sunday, March 15, 2009
Week of March 15
 I have a lot on my plate (no pun intended) this week, so most of our meals are super easy items I've made before.
Menu for the Week
Sunday
Rabbit stewed with vaquero beans and tomato
Sauteed kale
Monday
Asparagus and prosciutto bread pudding (this is an experiment, we'll see)
Green salad
Tuesday
Chili
Wednesday
Potato-onion soup
Thursday
Macaroni and cheese with broccoli
Friday
Pizza
Sunday, March 8, 2009
Week of March 8
 In true New England fashion, winter skulks out (throwing a sucker punch on occasion) and spring limps in. Almost 60 degrees today, but tomorrow we're expecting a high of 34 and 5 inches of snow. It makes the sun feel that much more precious, does it not?
Writing up a menu plan for a chilly week while you're sitting in the sun in a t-shirt can be challenging. I just thought about cozy, warming foods and went from there.
Menu for the Week
Sunday
Lasagna
Green salad with pickled shallots and pomelo
Monday
East African groundnut soup (this one's been in my reader for a while - time to try it)
Pickled carrot salad
Tuesday
Jacket potatoes (so much more fun than baked potatoes, which is what they are)
Roasted cauliflower with garlic, anchovy and parsley
Green salad
Wednesday
Red beans and rice (I got a locally raised and smoked ham bone to try in this)
Thursday
Roasted broccoli and shrimp (from the Amanda Hesser's NY Times recipe - too many positive endorsements to ignore!)
Friday
Pizza (was so good last week, figured we'd do it again)
Friday, March 6, 2009
Drink of the Week: Pisco Sour
 Beppo and I were introduced to the Pisco Sour by the engaging and knowledgeable bartending staff at Eastern Standard. In this drink, we were introduced to two new things: pisco, a Peruvian brandy (essential ingredient in a pisco sour) and drinks with eggs in them.
Let's get the egg issue out of the way: Most of us have probably had egg drinks and not known it. Any drink with a light froth on the top was (hopefully) made with an egg or egg white or a bar mix containing powdered egg whites or the appallingly named mixer-additive called "Foamy Head" (yum).
Anyhoo, for anyone out there who's squeamish about the idea of a raw egg in your cocktail: get over it I say. The egg white in this drink provides a creaminess that you can't get any other way. Think of it as a meringue float on the top of your cocktail - plus, it's additional protein to fortify you for the night ahead. If you're making your drink at home, this is yet another great motivator to get you to buy local fresh eggs.
Pisco Sour
 In an iced cocktail shaker, vigorously shake together:
- 1 1/2 ounces pisco
- 1 ounce simple syrup
- 3/4 ounce lemon juice
- 1 egg white (this will be enough if you're going to make two drinks at once)
May 13 - Edited to add my How2Heroes video on making a Pisco Sour!
Subscribe to:
Posts (Atom)